Product description
Service Desk Chat offers the integration of direct messaging in your Matrix42 DWP. An intuitive user interface ensures a quick start for support staff and end users of the system. Requests to the service desk can be linked to existing tickets, incidents and service requests, or new ones can be created.
With the integration of Microsoft Teams and the integration for external websites, the end user is also able to submit a request directly via the Microsoft Teams chat interface or via an external website to communicate with the service desk employee.
The extension adapts to all standard Matrix42 UUX designs.
Prerequisites
- Central Administration
- Matrix42 Enterprise Service Management: at least version 11.0.2.
Important note
Before installing the extension, you should make a backup of your Matrix42 Workspace Management, because this extension cannot be uninstalled.
Installation
The Service Desk Chat extension is installed from Central Administration. You can find more detailed information on installing an extension via Central Administration under „Installing & updating extensions“ in the Central Administration documentation.
Configurations
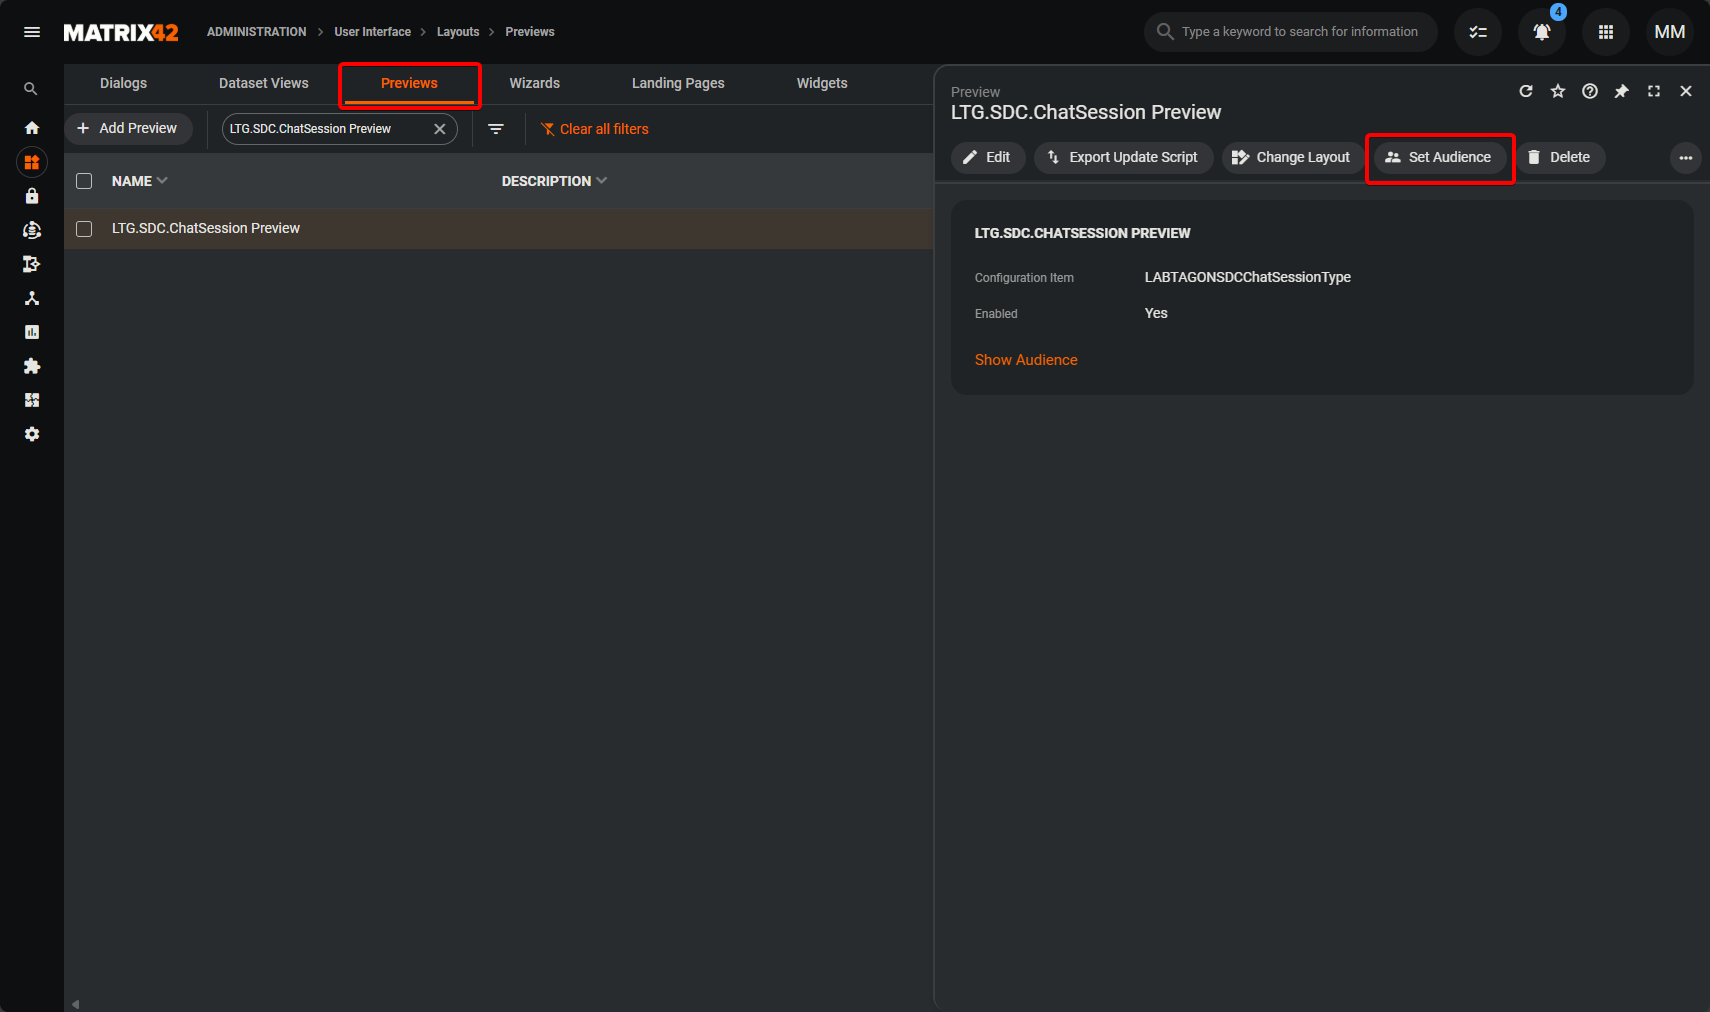
Since version 1.2.0 of Service Desk Chat, it is not mandatory to set object permissions, as permissions are determined based on authorized roles. If you wish to grant agents or end-users the action „View Chat Sessions“, these users will need object permissions to read chat sessions and incidents (or tickets/service requests). Additionally, end-users will require permissions for the web services „ServiceDeskChat.GetChatSession“ and „ServiceDeskChat.GetChatSessionsOfRequest“. The same applies if users are to have access to the preview „LTG.SDC.ChatSession Preview“.
You can authorize the quick view using the „Set Audience“ action.
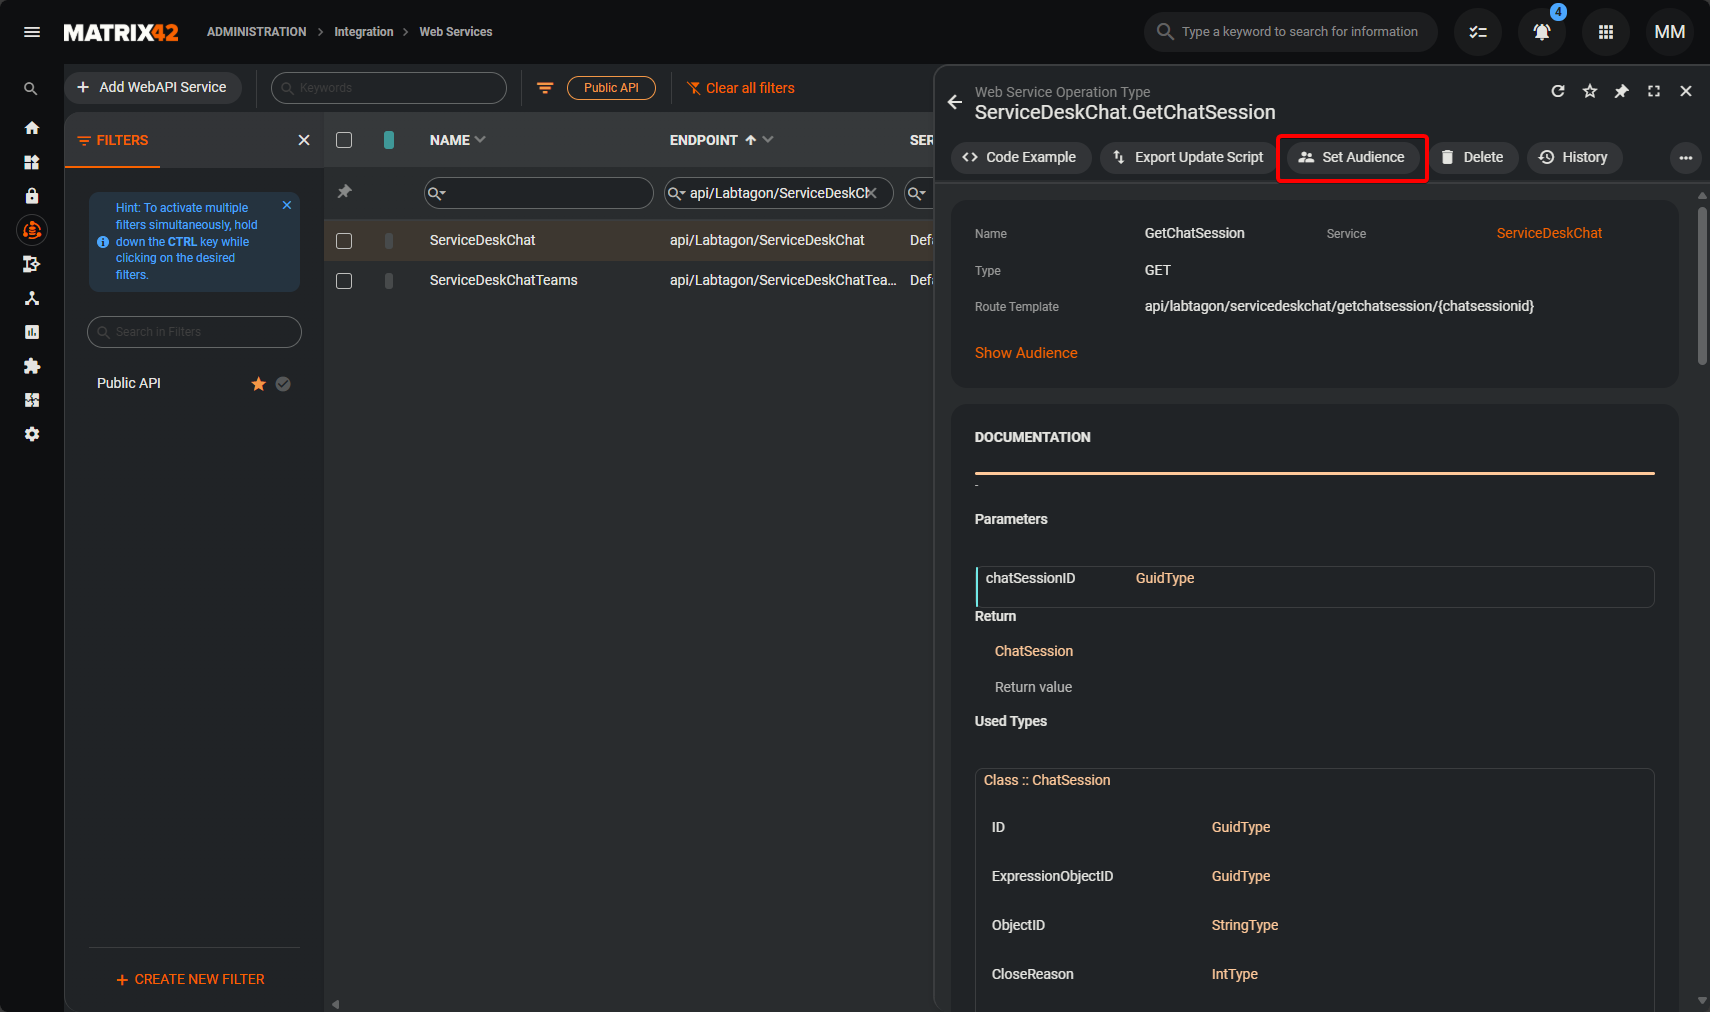
To authorize the web services, navigate to „Integration“ -> „Web Services“ in the administration. There, search for „api/Labtagon/ServiceDeskChat“ in the endpoint column and select the WebAPI service „ServiceDeskChat“. In the preview, you will see all web services under „Operations“. Click on a web service to open the preview where you can perform the „Set Audience“ action as usual to authorize the end users or roles for this web service.
You can also add your own languages to the system messages. English and German are supplied as standard. If you want to add another language to the system messages, you can overwrite the content and the anonymized content within the data of the „LABTAGONSDCChatSessionPickupSystemMessage“ pickup dialogue if you have set the desired language.
Please do not overwrite the supplied text.
You can also make your desired configurations in the configuration dialog of the extension. You can open the configuration dialog via the Central Administration. The Central Administration view can be found in the Administration under „Extensions“ -> „Labtagon“ -> „Extensions“. Click on the „Configure“ button within the Service Desk Chat card to open the configuration dialog.
General Configurations
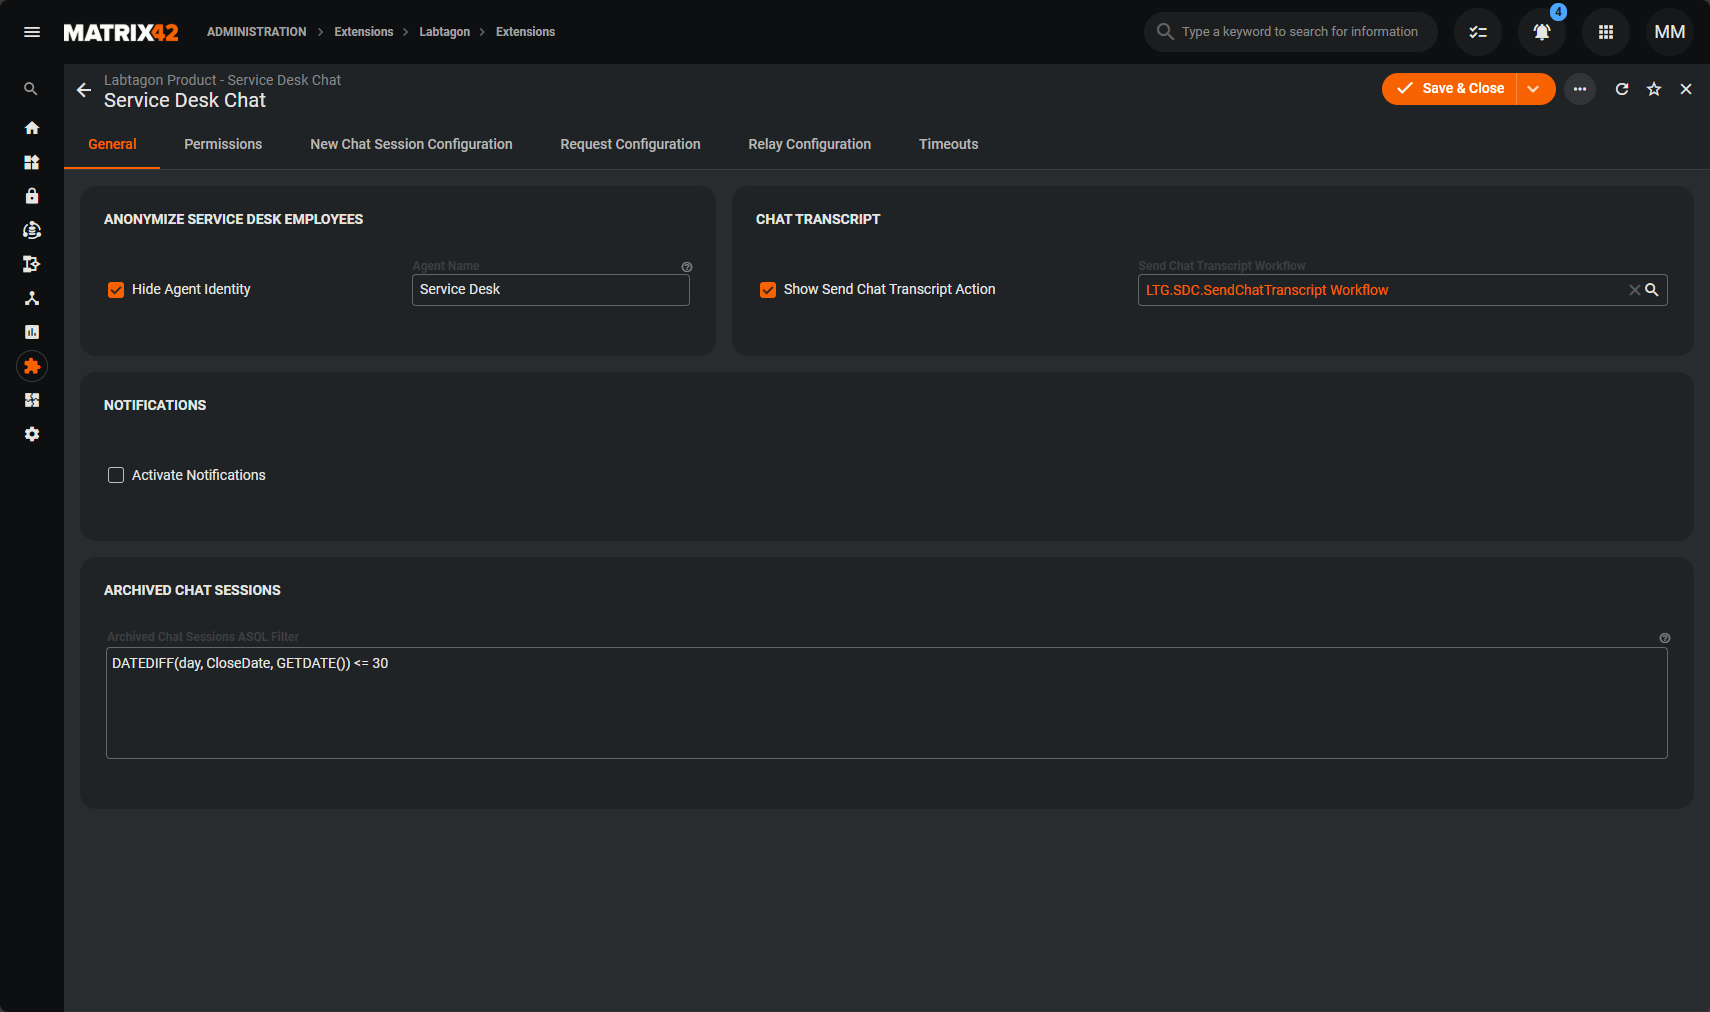
Anonymization of service desk employees
This configuration prevents end users from seeing who they are writing to from the Service Desk team. The Service Desk team members can still see who has sent a request and with which end user they are writing.
Use the checkbox to activate the configuration and then maintain an agent name. The agent name is displayed instead of the name of the Service Desk employee.

Chat Transcript
As of version 1.1.0 of Service Desk Chat, we offer you the option of sending a chat transcript. The chat transcript contains all messages between users within the chat. The scope of functions includes a sample workflow, which is executed by the action „Send chat transcript“. This action is shown to you when a chat session is closed or after the chat session is closed within the chat view. The workflow sends an email based on an email template. You have the option of copying this workflow and the email template to customize it according to your wishes.

Notifications
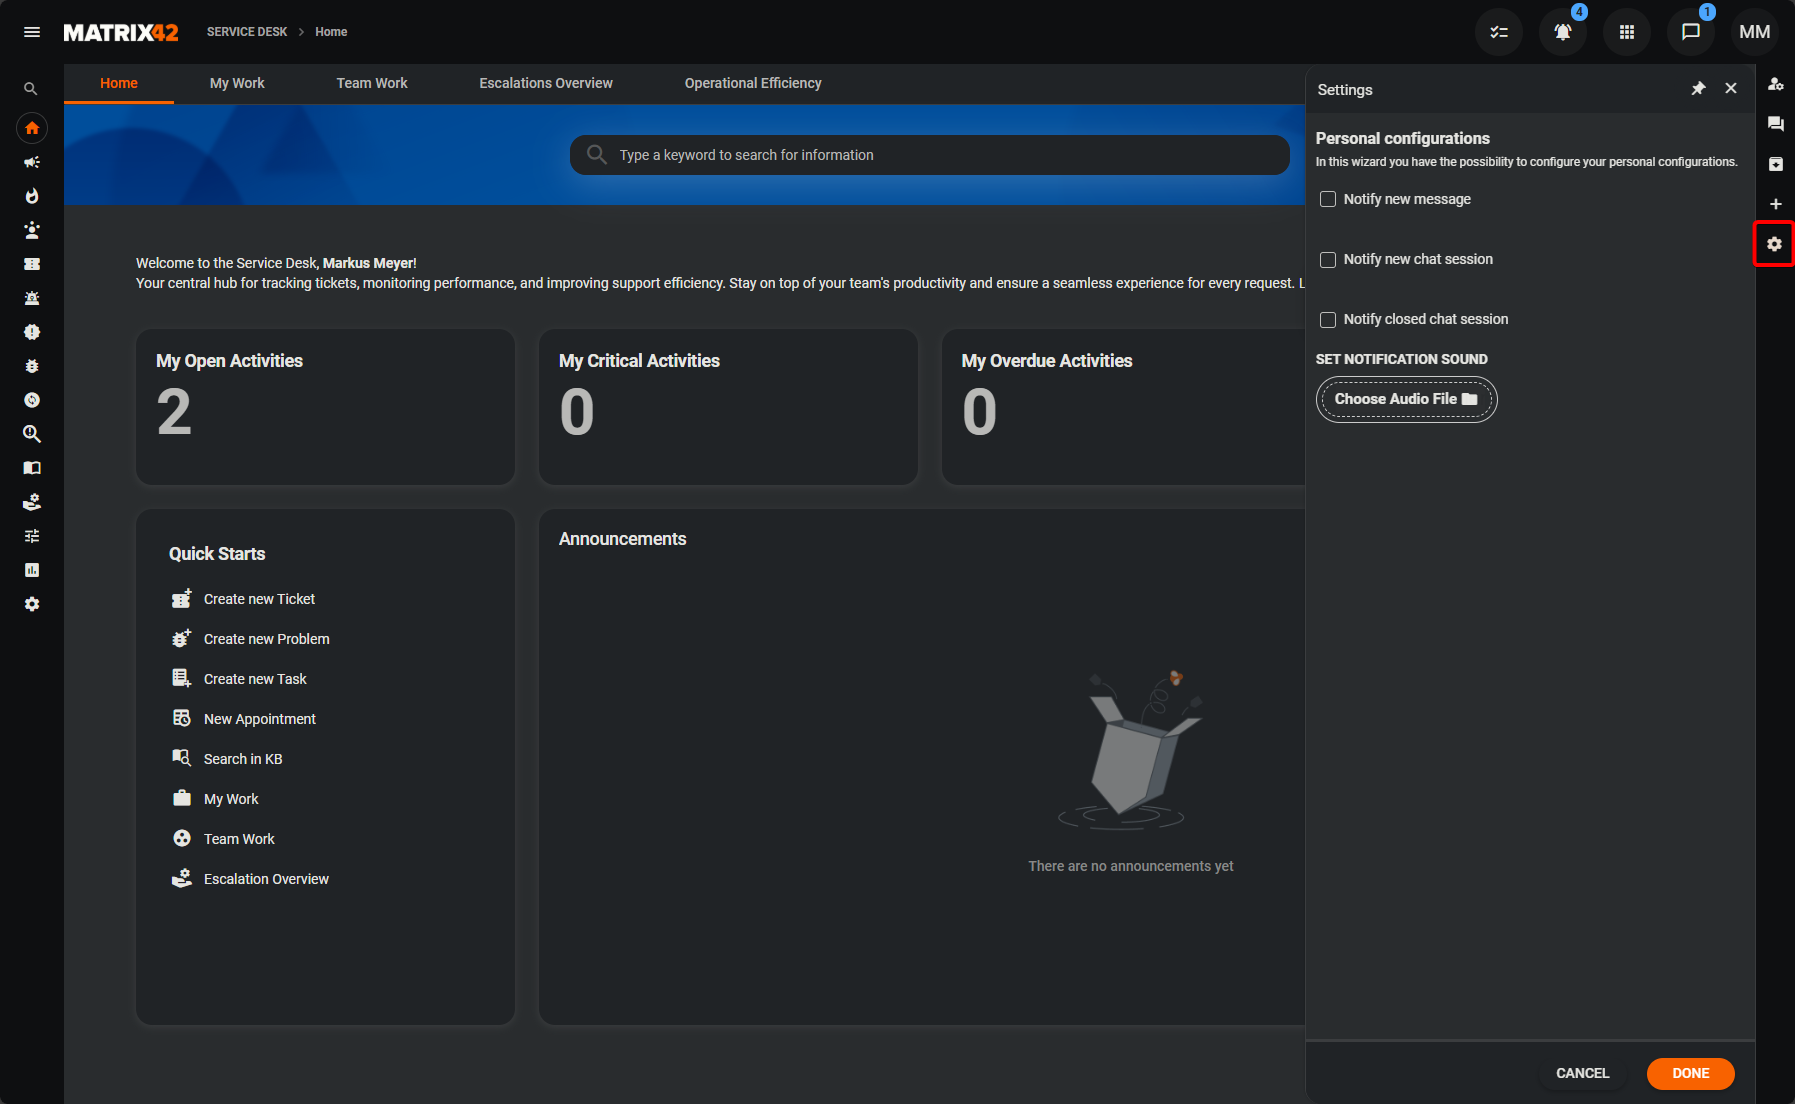
You can activate the notifications using the „Activate Notifications“ checkbox. You can use the three other checkboxes to decide which type of changes should be notified. The notifications are only the sound notifications in the browser. To set your desired sound for the notification, you need to select an „mp3“ file. Subsequently, the audio can be played using the underlying audio element.

Archived Chat Sessions
Within the configurations for archived chat sessions, you can store an additional ASQL filter that additionally filters your archived chat sessions. By default, the archived chat sessions are filtered according to whether the closing date is not older than 30 days. This filter looks like this:
DATEDIFF(day, CloseDate, GETDATE()) <= 30
Only chat sessions that have been closed and in which you are a member are shown under the archived chat sessions.

Permissions
Permissions can be configured in the „Permissions“ view. In this view, you will find applications and agent roles at the top. Beneath these configurations, there is a checkbox to allow external users to chat. If you activate this checkbox, internal users in Matrix42 ESM will also be able to chat. If you choose not to allow external users to chat, you can specify the authorized roles. These roles are granted access to the Service Desk Chat extension in your Matrix42 ESM. Right next to the authorized roles, you can specify the authorized relay roles, which are allowed to communicate with the Service Desk through the relay.
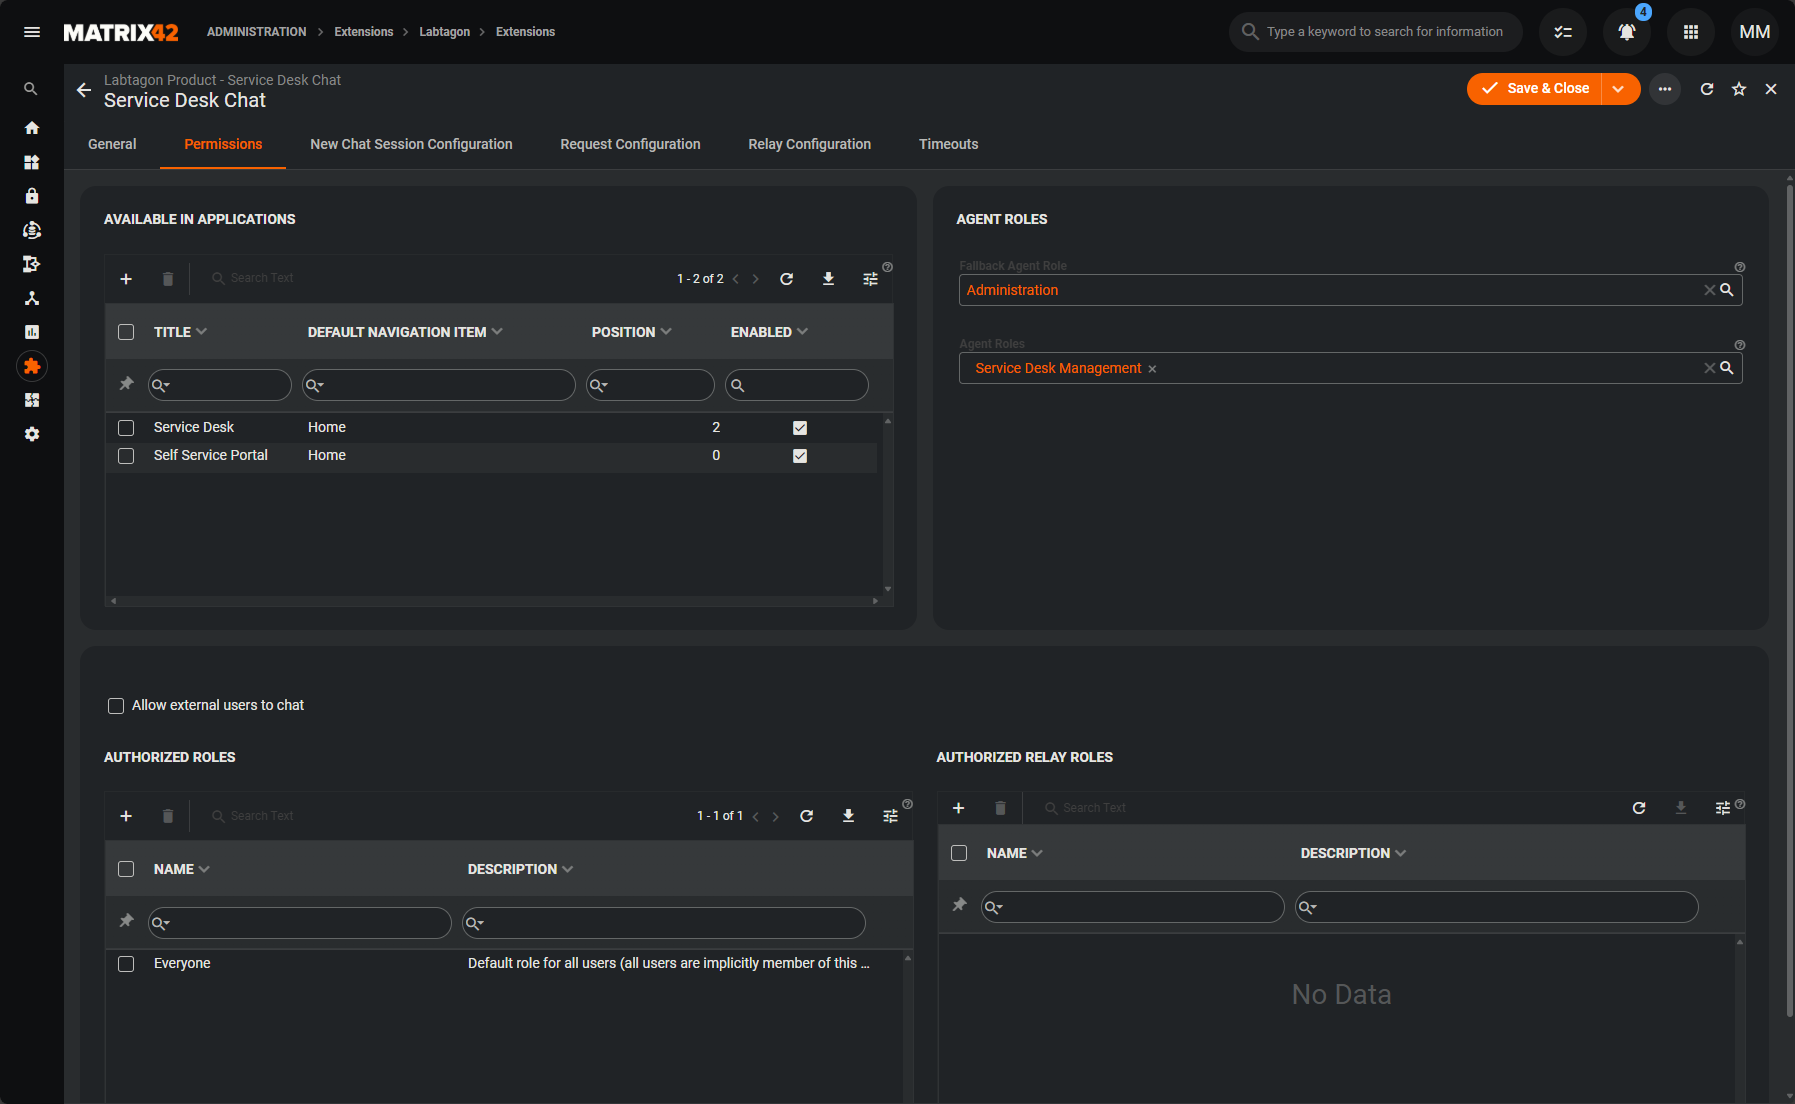
Configuration for displaying the extension in certain applications
In the „Permissions“ view within the configurations, you will also find the option to restrict the Service Desk Chat extension for certain applications.
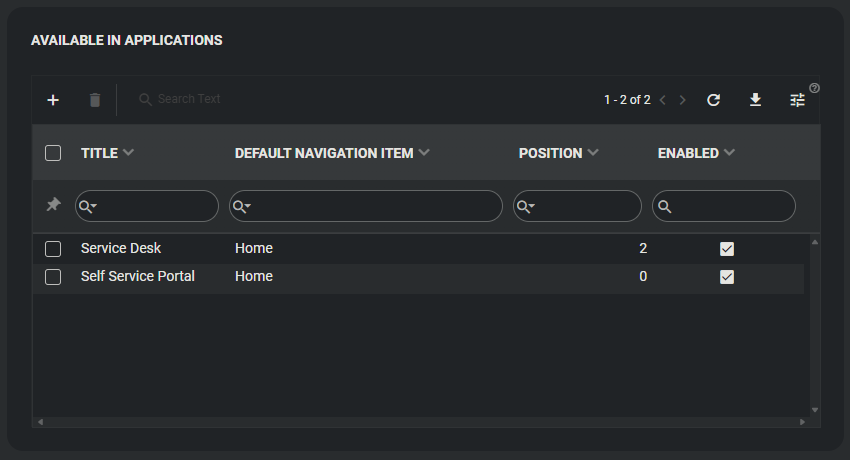
Agent Roles
Agent roles can view and accept chat requests. An additional menu item for chat requests is displayed to the members of the agent roles in the Service Desk Chat extension. The agent can only accept a chat request if they are a role member in the role responsible for the ticket created by the chat request. Once the chat has been accepted, the role of the ticket is irrelevant. This is necessary as the role could be changed by the ticket transformation.
The Service Desk Management role is automatically assigned all authorizations for chat sessions.
The fallback role is used to ensure that chat requests do not remain unanswered if the role is not stored in the „Agent roles“ configuration in the ticket created by the chat request.
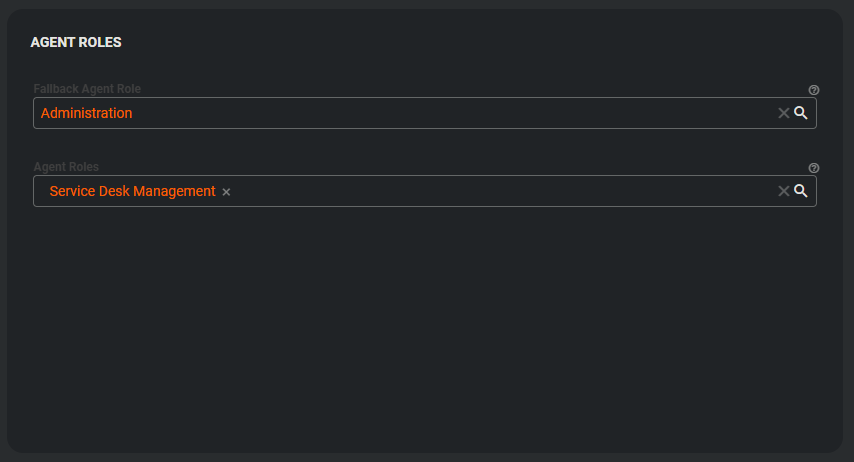
Configurations for new chat sessions
The configurations for new chat sessions can be found in the separate „New Chat Session Configuration“ view. You can make the following configurations in the view:
- New Chat Session Request Type
Here you define the type that should be created when a chat session is created if you are not referencing an existing request. The ticket type (SPSActivityTypeTicket) is only displayed if you have activated ticketing in your Service Desk settings.
- New Chat Session Request Entry By
If you create a new request with the creation of a chat session, you can select here what is entered in the „Entry By“ column.
- Related Activities Filter
This is a filter to filter the activities that can be referenced when creating a chat session. In addition to this filter, the activities are checked to see whether there are already active chat sessions for the activities. The standard filter is as follows:
Initiator = CURRENTUSERID() AND (UsedInTypeSPSActivityTypeIncident IS NOT NULL OR UsedInTypeSPSActivityTypeServiceRequest IS NOT NULL OR UsedInTypeSPSActivityTypeTicket IS NOT NULL)
- New Chat Intro Text
The chat intro text is displayed in the first system message of the chat session. This can be translated using the localization mode.
- Category Configurations
You can switch the configuration for displaying the request category in the request dialog on and off as required. If this configuration is switched on, you can also define a main element for the selection of categories in the request dialog. A „Category“ selection field is also displayed in the request dialog. If you do not enter anything in the selection field, the category of the request type is stored by default. You can also mark this selection field as required.
Request Configuration
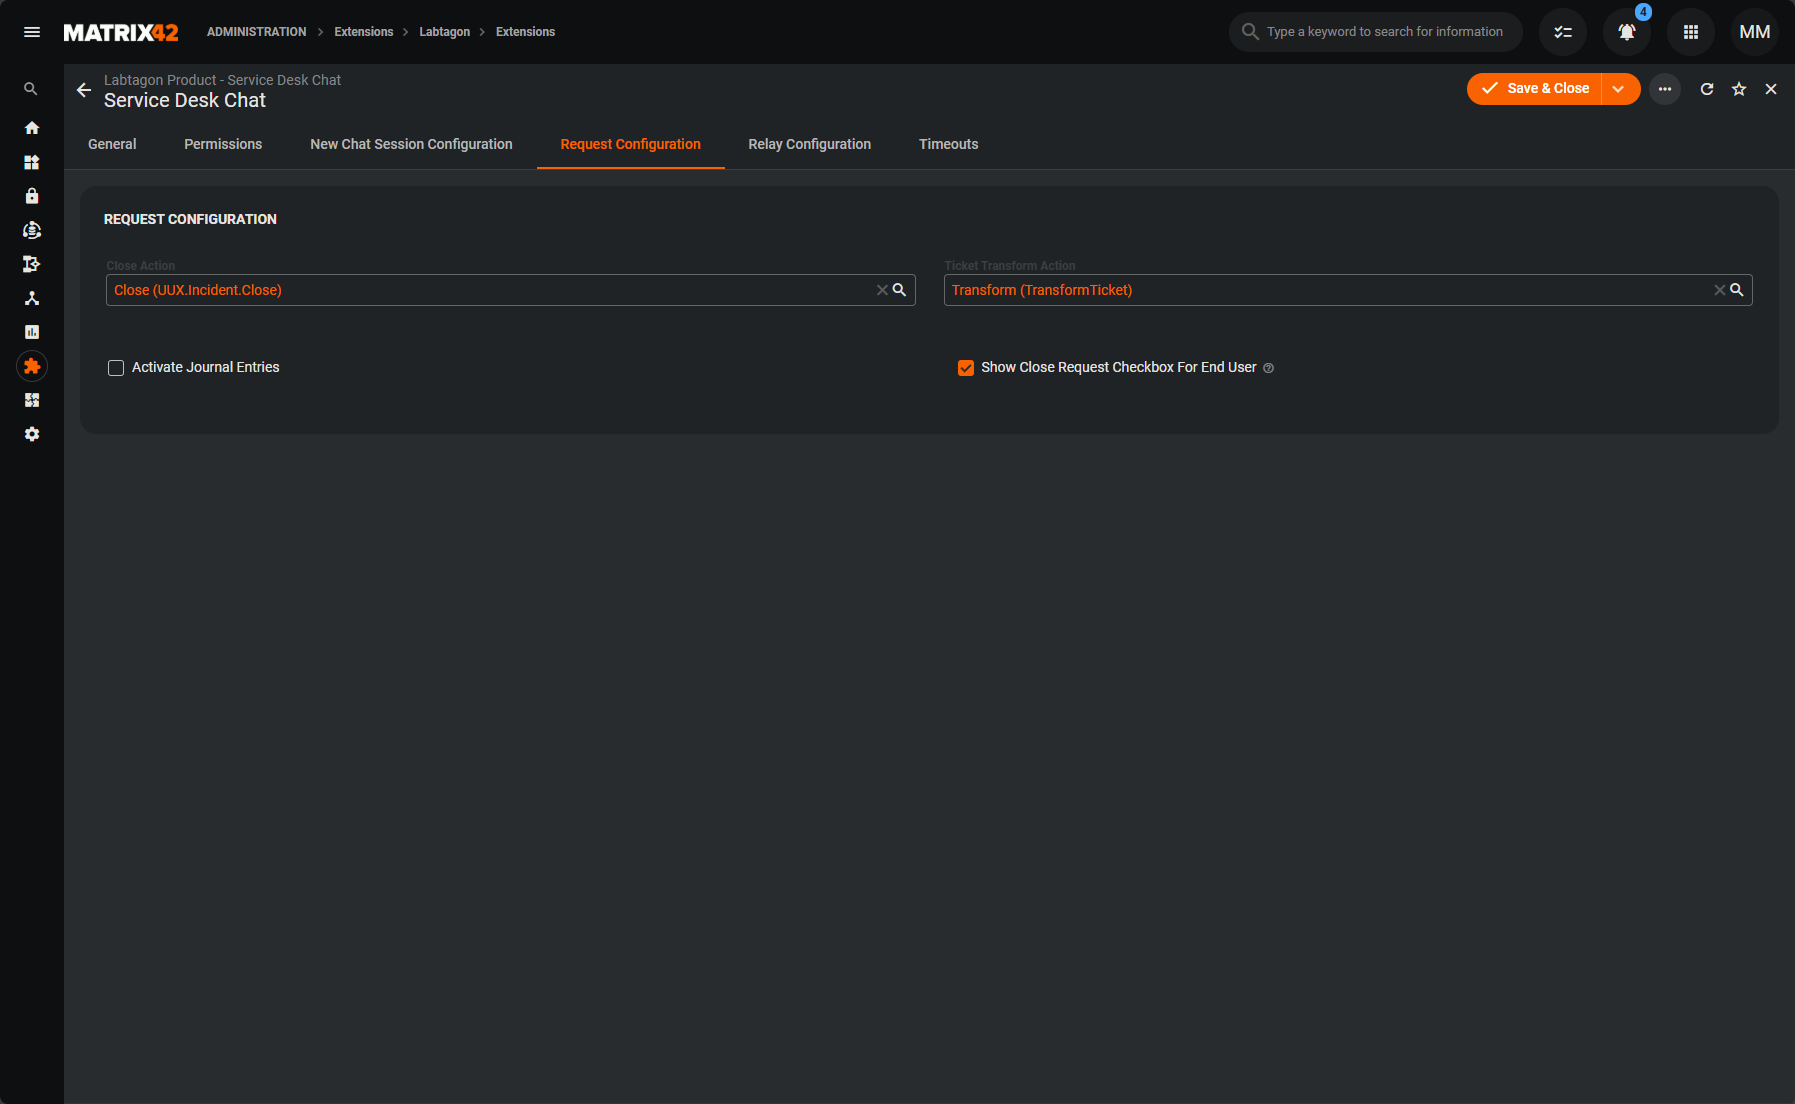
The request configurations have a separate view in the configuration dialog. You can store an action for closing requests and an action for converting tickets there if ticketing is activated in your service desk settings. Please note that only actions that are activated can be displayed and used. In this view, you also have the option of activating journal entries and making the generated journal entries visible in the portal. If you activate journal entries, journal entries with the respective description are created for the request when a chat session is created, closed and forwarded. Furthermore, you can configure whether you want to display the checkbox „Do you want the related request to be closed?“ to the end user when closing a chat session.
Relay Configuration
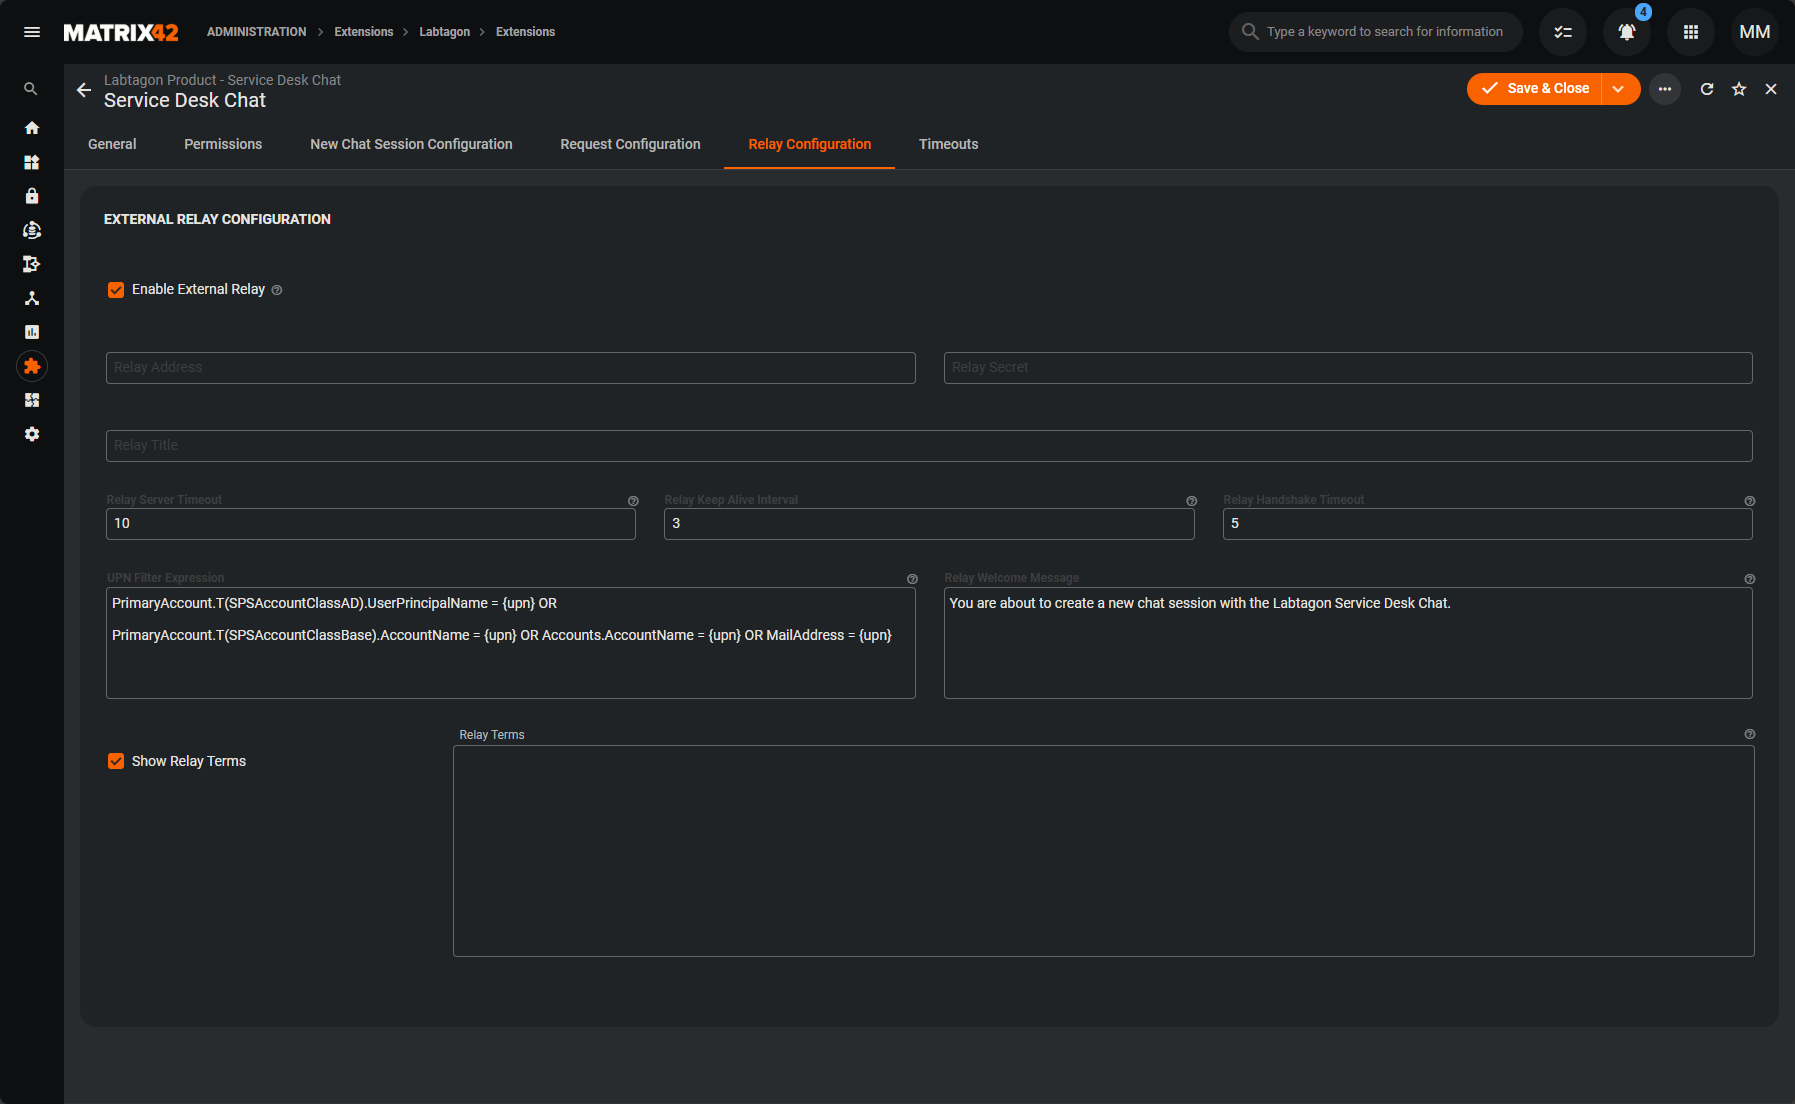
You can store all configurations for the external relay in this view.
- Relay Address
You should enter the URL of the external relay.
- Relay Secret
This is where you store the external relay secret so that the Service Desk Chat extension can connect to the relay without any problems.
- Relay Title
You can enter the name of the external relay. Not relevant for the Microsoft Teams relay.
- Relay Server Timeout
This setting defines how long the Matrix42 system should wait for a response from the relay before considering the connection interrupted due to inactivity or a fault. If the set time period is exceeded, a timeout occurs, and the server will either try to re-establish the connection or suggest an alternative action. The timeout is specified in seconds.
- Relay Keep Alive Interval
This attribute defines how often the Matrix42 system sends a „Keep Alive“ signal to ensure that the connection to the relay remains active. It helps bridge longer periods of inactivity and prevents the connection from being automatically closed due to idle time. The interval is specified in seconds.
- Relay Handshake Timeout
This attribute indicates how long the Matrix42 system should wait for the handshake process (the initial connection setup) with the relay to complete. If the handshake is not successfully completed within this time frame, a timeout occurs. This could indicate a network issue or a problem with the availability of the relay. The timeout is specified in seconds.
- UPN Filter Expression
This ASQL filter expression is used to match the UPN. To be able to match the UPN, you must add the following „{upn}“ to the expression. You write this text where the actual UPN will be matched later. This is to be used as in the following example. The default filter is as follows:
PrimaryAccount.T(SPSAccountClassAD).UserPrincipalName = {upn} OR PrimaryAccount.T(SPSAccountClassBase).AccountName = {upn} OR Accounts.AccountName = {upn}
- Relay Welcome Message
This is the welcome text for the creation form in external relay.
- Relay Terms
The relay terms are displayed in the external website relay and can be activated via the checkbox. In the text box, you can enter your terms. The terms must be accepted by the end user. Otherwise the end users won’t be able to start a chat.
Timeouts
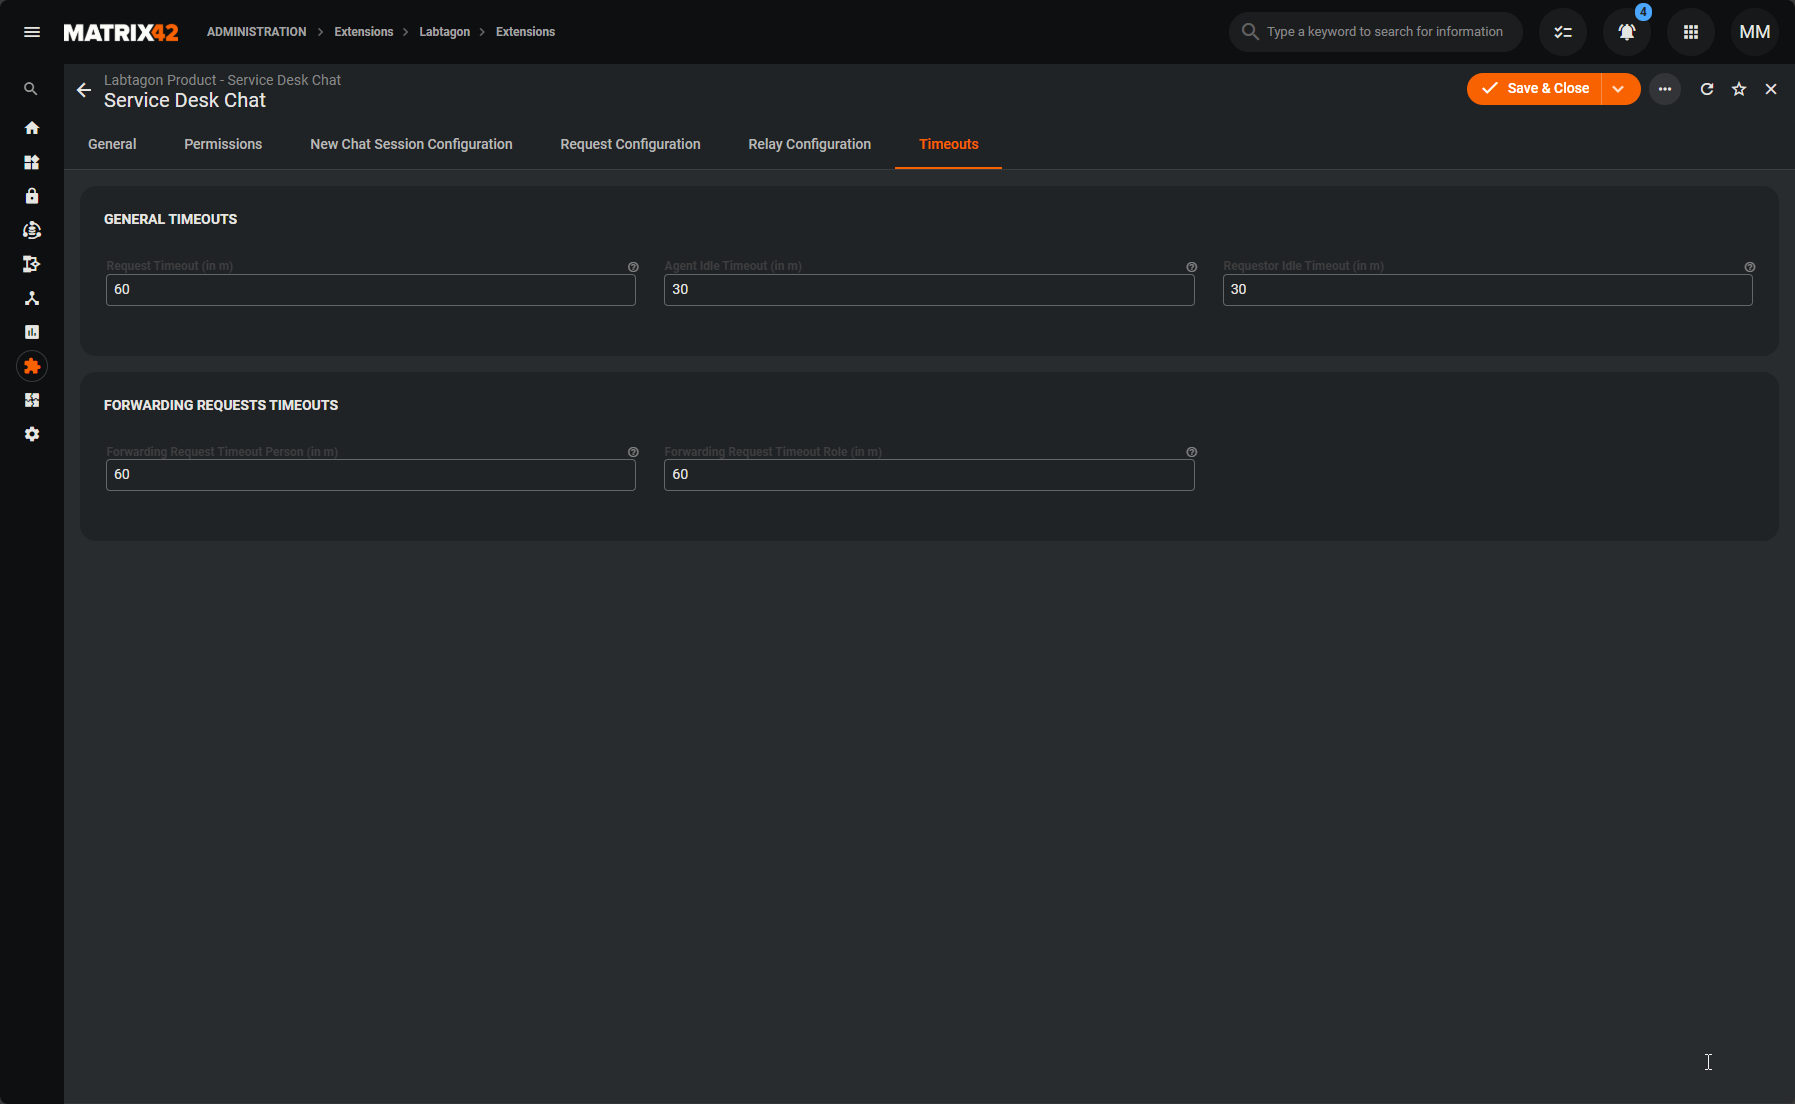
In this view, you have the option of setting the timeouts. With the „General Timeouts“, the chats are automatically closed when they are reached with a closure reason and a system message. The timeouts for forwarding requests mean that the forwarding request is canceled, and the chat remains with the current agent, who can then communicate with the end user as usual. You can set the following timeouts:
- Request Timeout
This refers to the time period during which no agent has accepted the request. After this time period, the chat session will be automatically closed.
- Agent Idle Timeout
This refers to the time period after which an agent in a chat session is considered inactive if they do not send or receive any messages. After this time period, the chat session will be automatically closed.
- Requestor Idle Timeout
This refers to the time period after which an applicant in a chat session is considered inactive if they do not send or receive any messages. After this time period, the chat session will be automatically closed.
- Forwarding Request Timeout Person
This refers to the time period since the chat session was forwarded to the new agent. After this time period, the chat session will be automatically reassigned to the original agent.
- Forwarding Request Timeout Role
This denotes the time period since the chat session was forwarded to the responsible role. After this time period, the chat session will be automatically reassigned to the original agent.
Integration of the quick link for creating chat sessions in the Self Service Portal
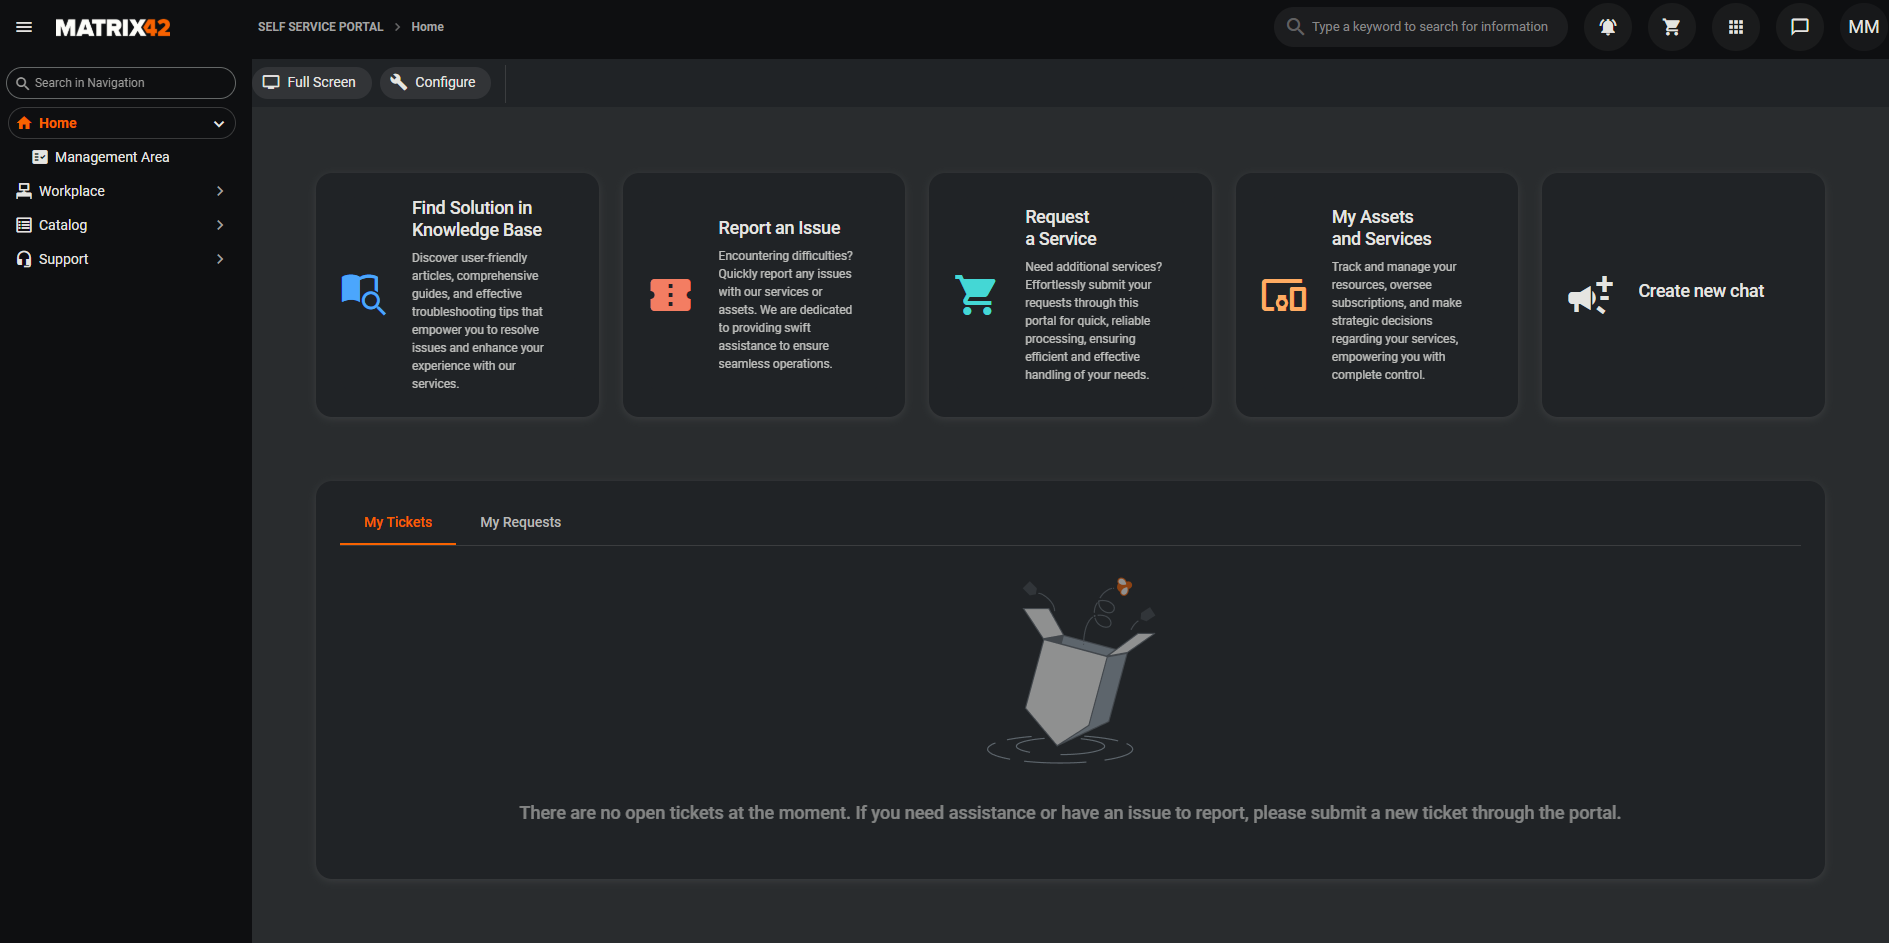
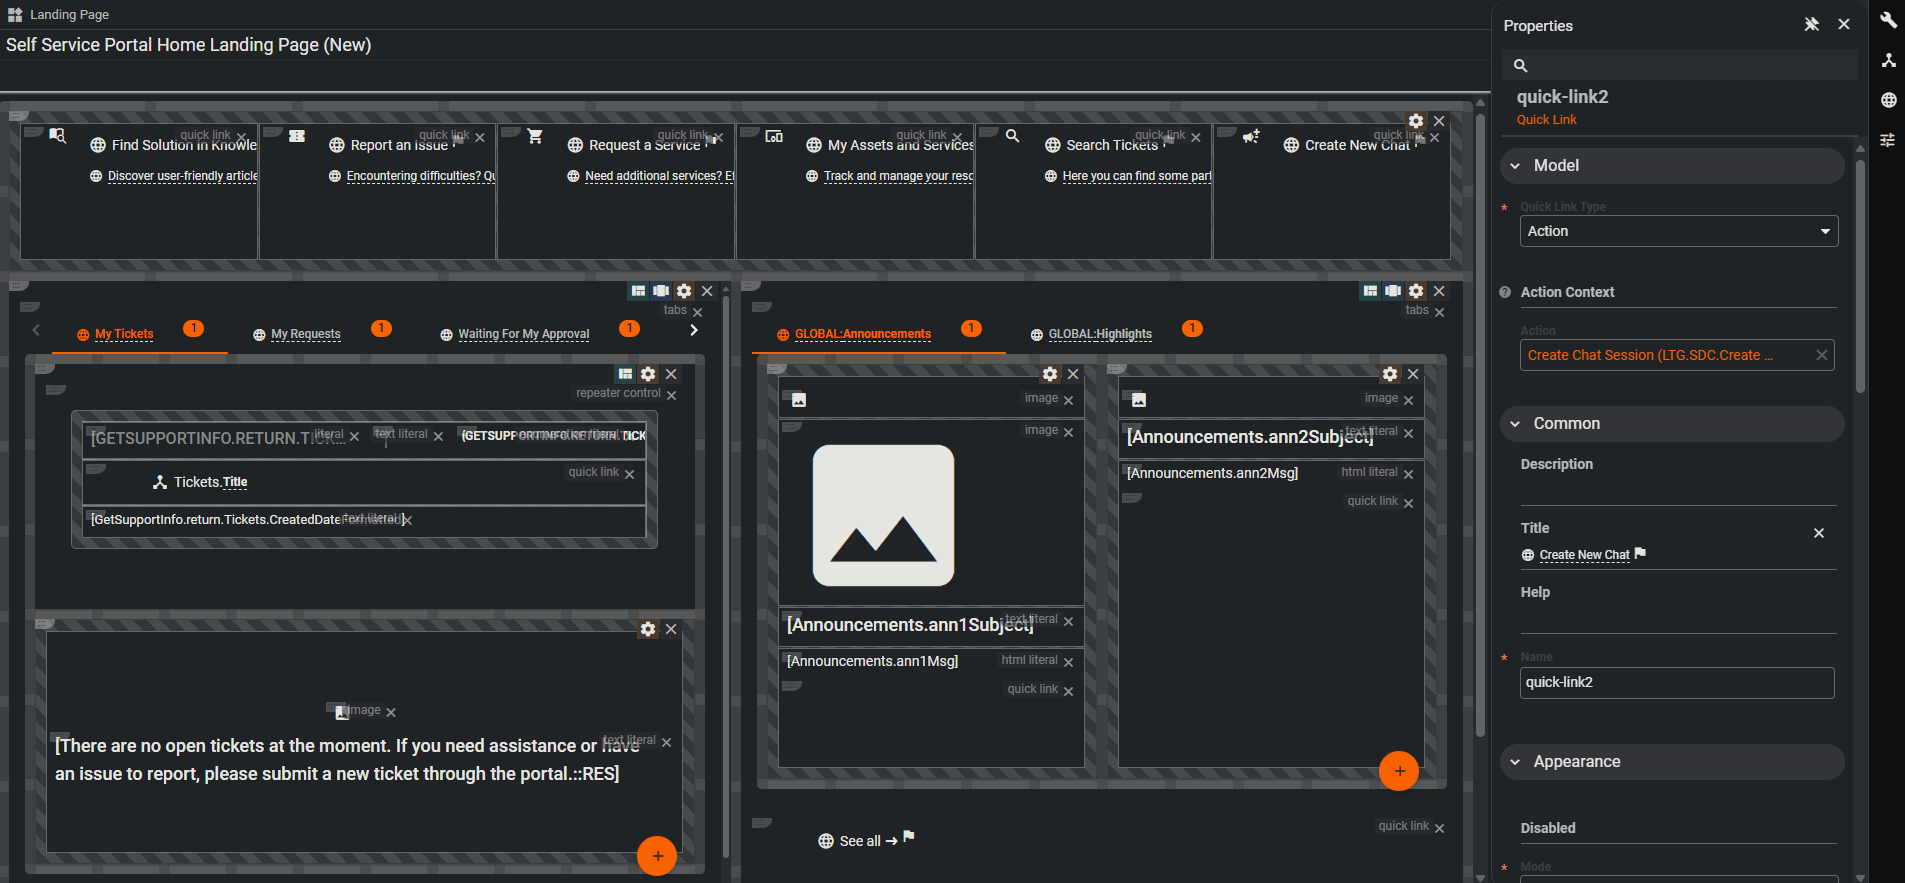
To integrate the quick link, you must edit the layout of the landing page of the Self Service Portal. In the Layout Designer, add a new quick link at the desired position. On the quick link, configure the quick link type to „Action“ and store the action „Create Chat Session (LTG.SDC.Create Chat Session)“.
Operation
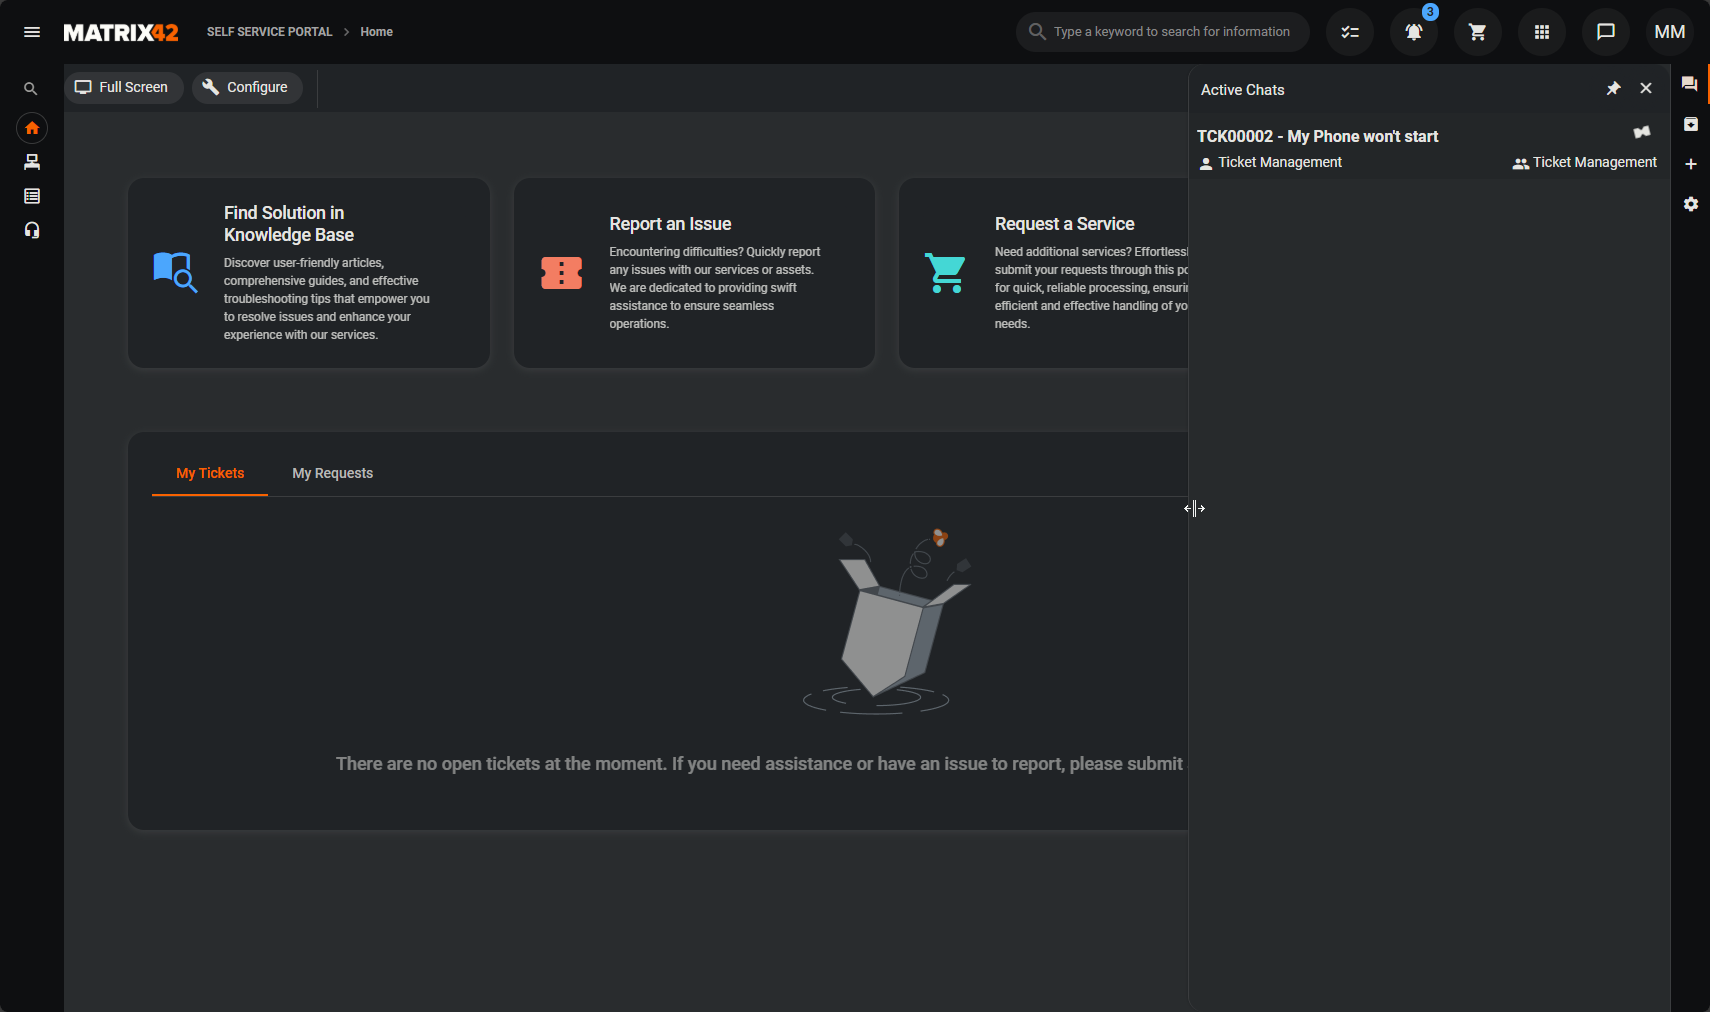
You can open the Service Desk Chat extension via the Chat button in the application toolbar. Clicking on the button opens a sidebar on the right and automatically displays the active chat sessions.
When new messages or new requests are sent to the current user, the chat button shows how many requests are pending and how many chat sessions have received new messages.
Create chat session
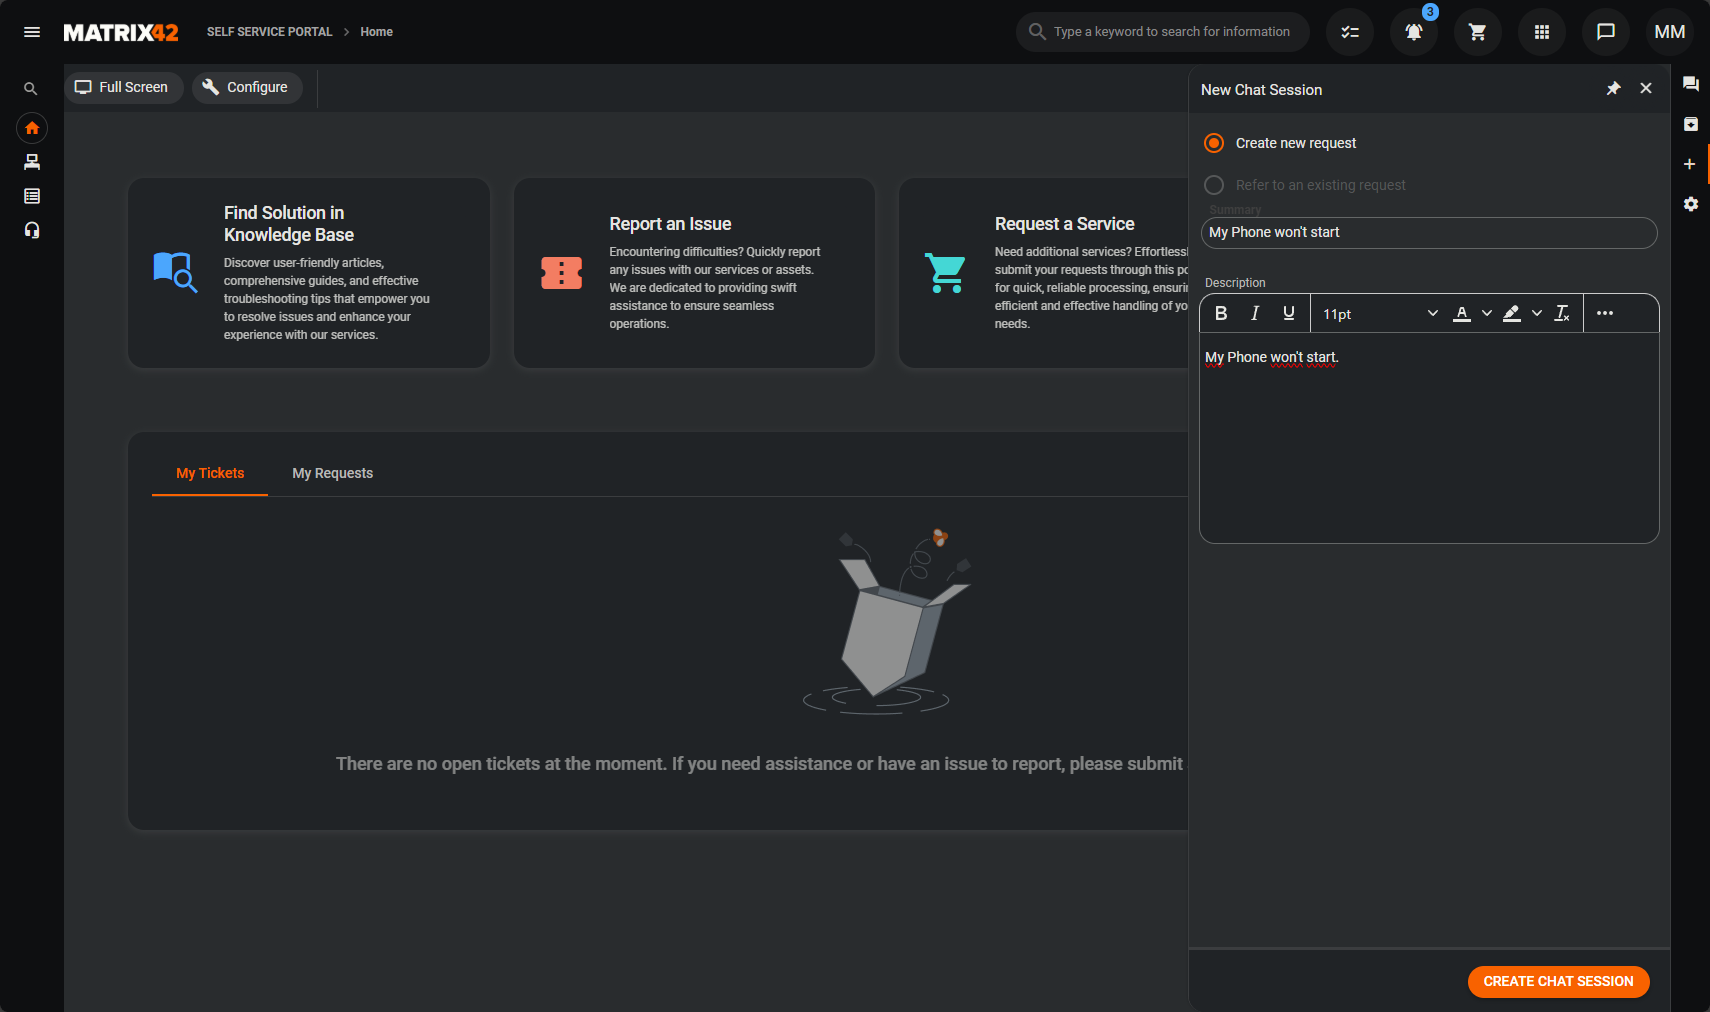
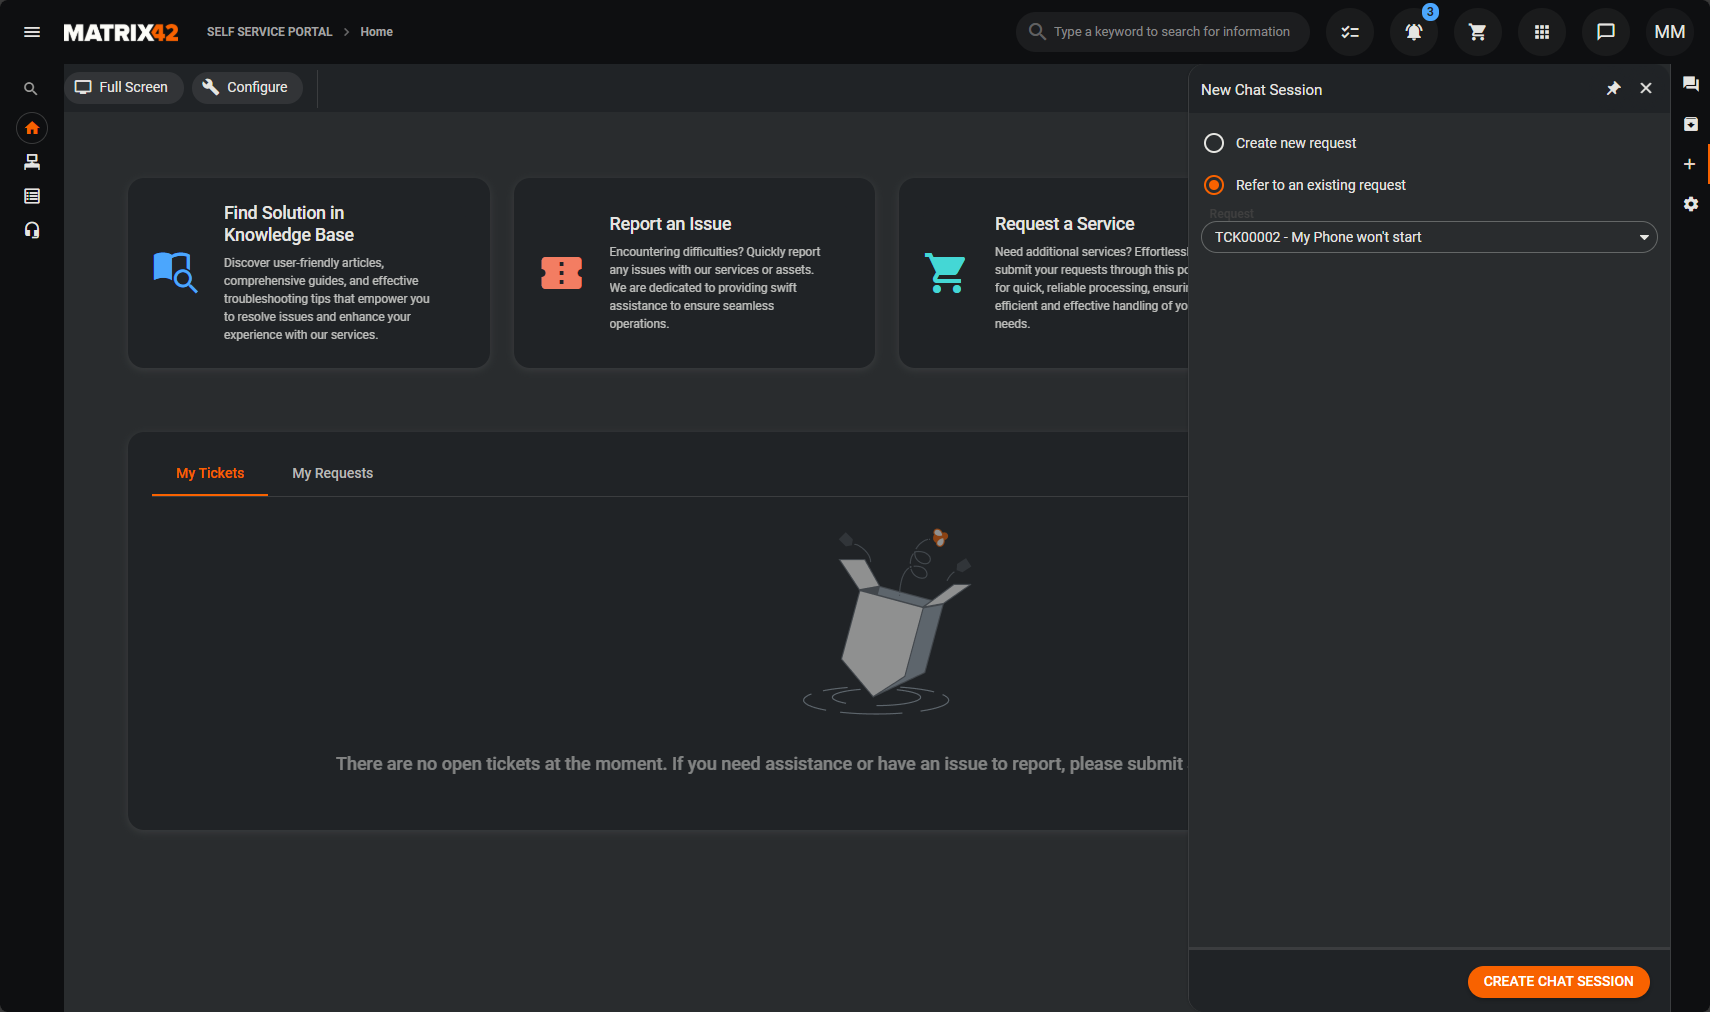
New chat sessions can be created via the „New Chat“ menu item. There you can either create a new request or refer to an existing request.
You can also add a quick link to the Self Service Portal to create a new chat session from there. You can find instructions on how to create the quick link in this documentation under „Integrating the quick link to create chat sessions in the Self Service Portal“.
Accept Chat Requests
As an agent, you can accept chat requests under the menu item „Chat Requests“. The chat requests are divided into two categories. In the first place, you will see the chat requests that are directly assigned to you. In the second place, you will see the chat requests that have been sent to your role.
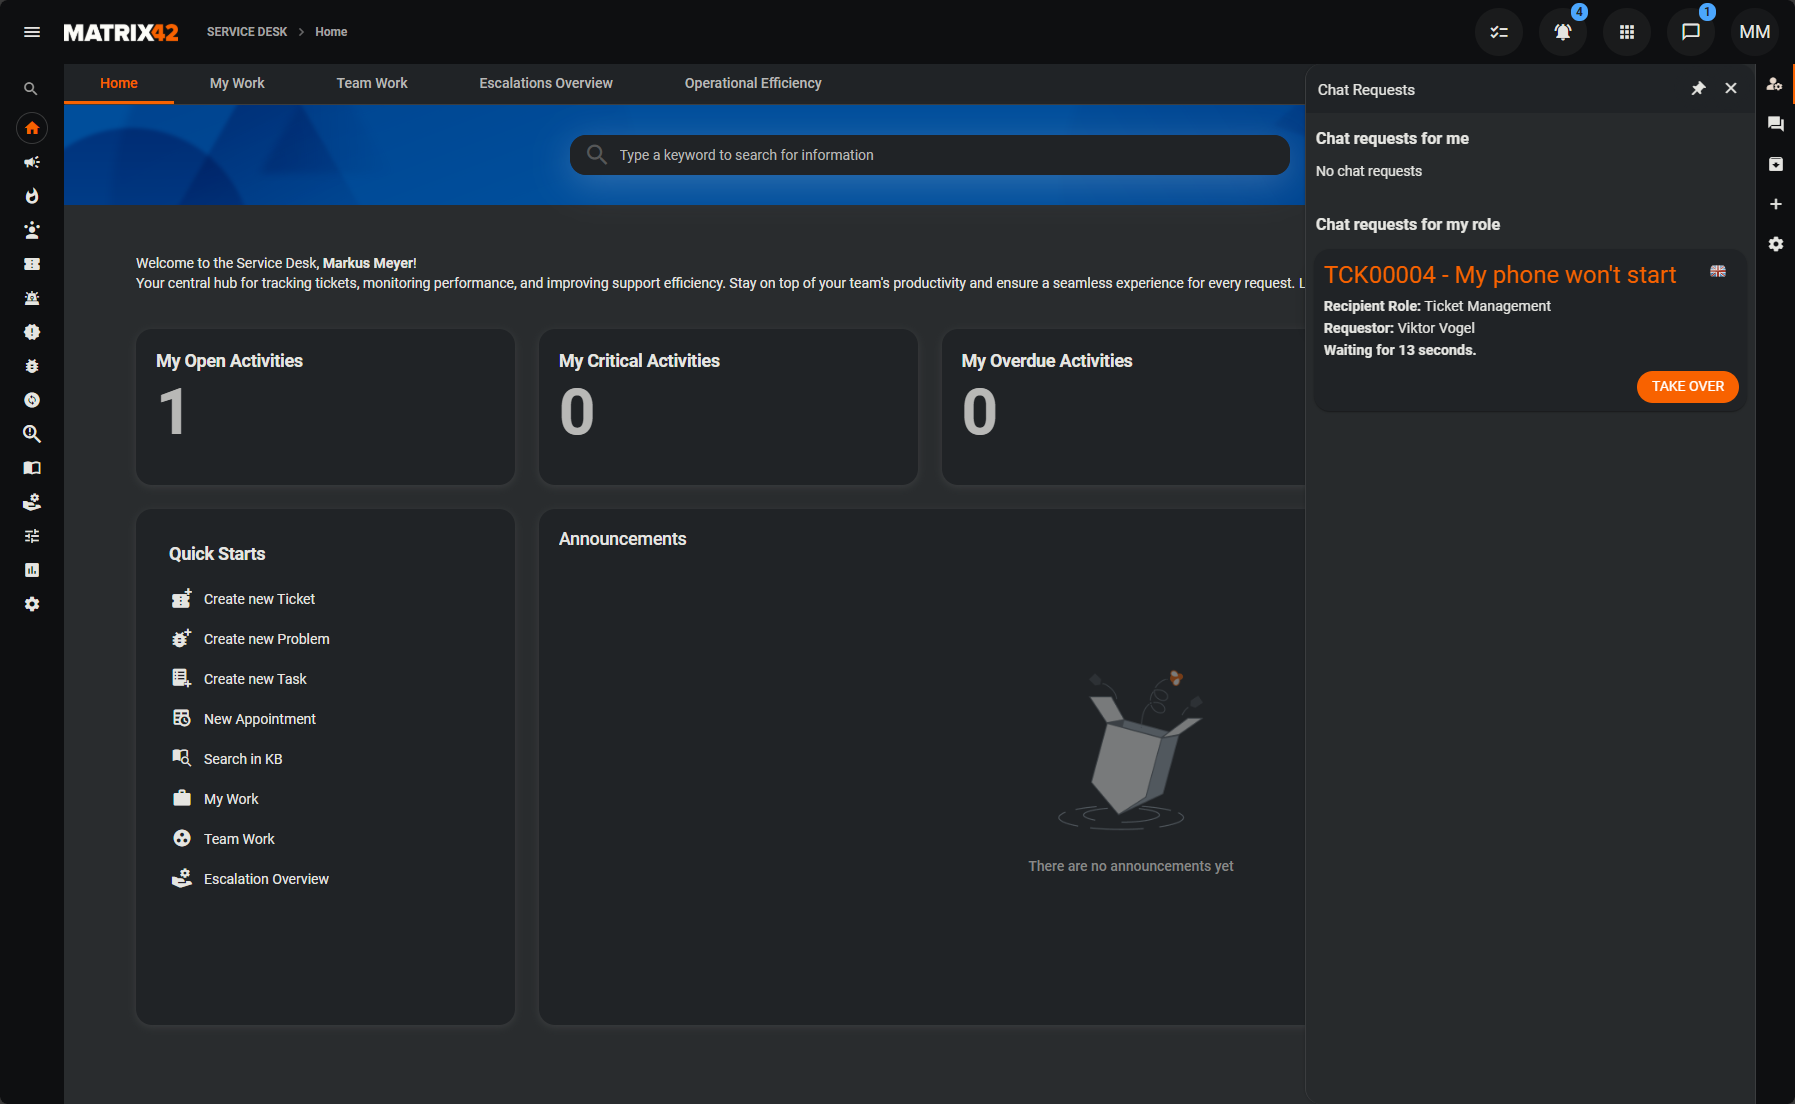
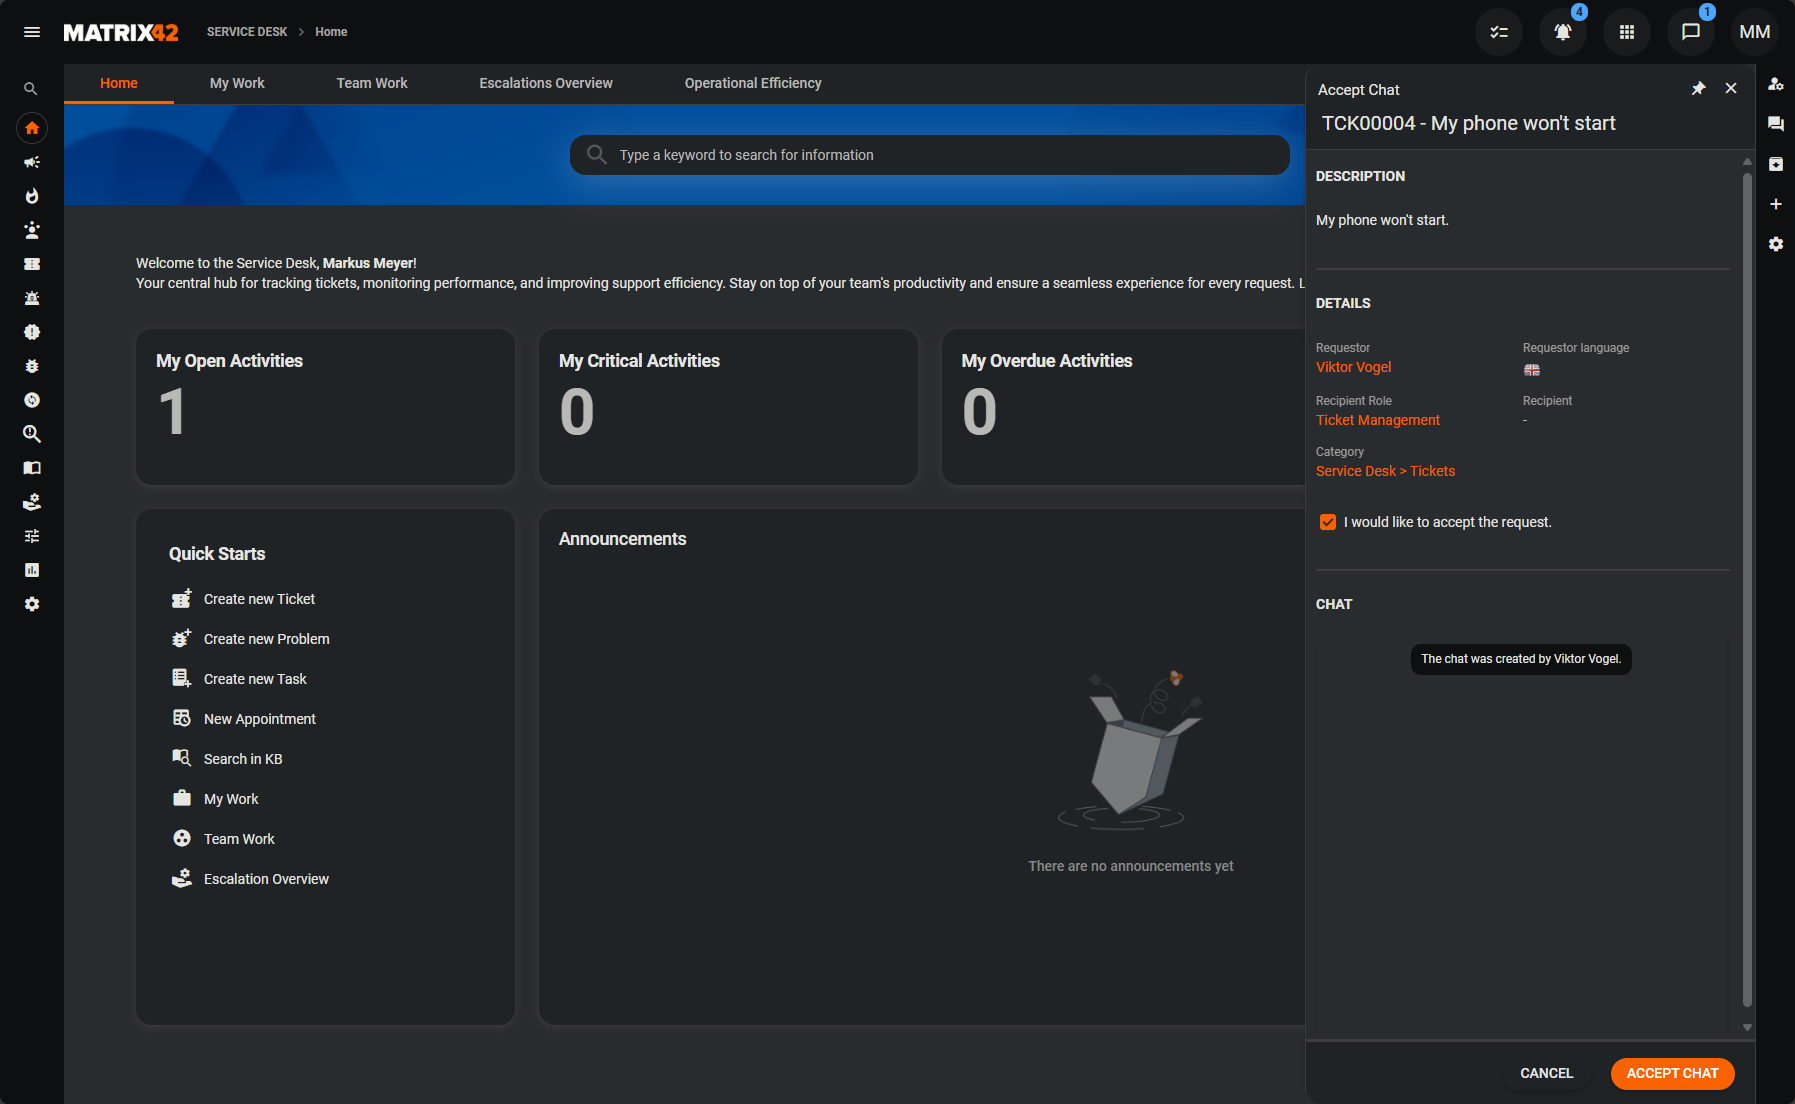
If you click on a button, an acceptance wizard will open. In this acceptance wizard, you can use the checkbox to directly accept or accept the request for the chat session. The request is accepted if you are the person responsible for the request, otherwise the request is accepted.
Chatting
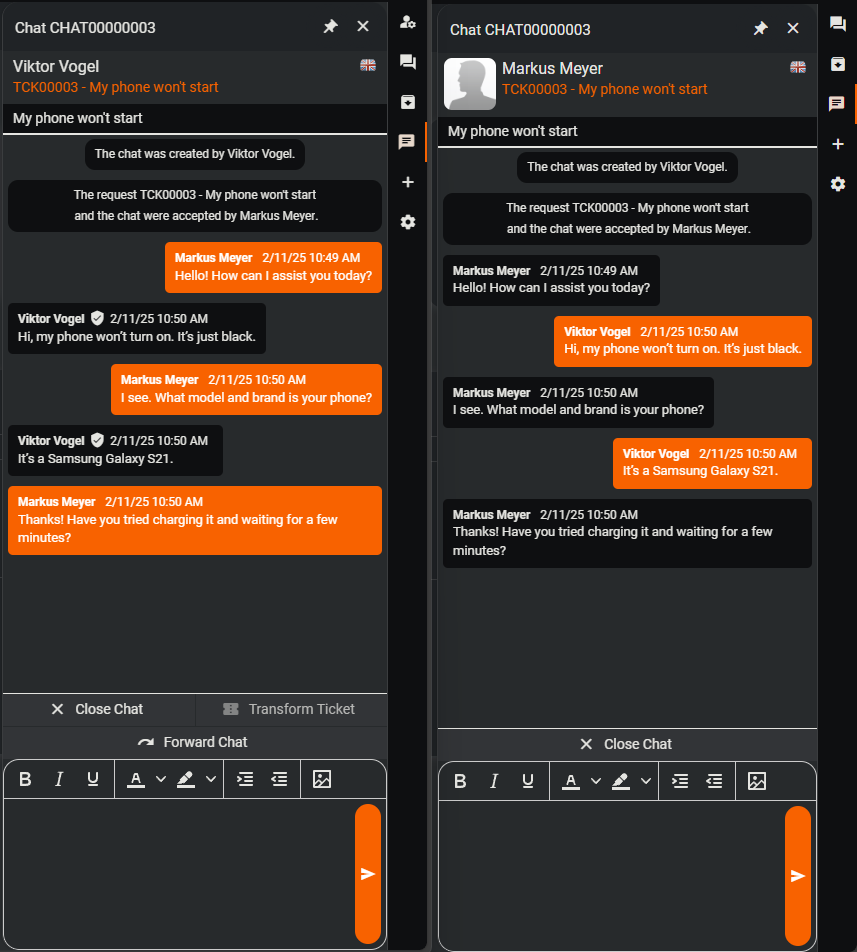
If you click on a chat session in the „Active chats“ menu item, a chat view is displayed. There you can simply chat with your chat partner. To send a message to your chat partner, click in the text field, write your message and click on the „Send“ button.
In addition to the normal messages, there are also so-called system messages. These are displayed in the middle of the chat and are sent by the system and contain information about the chat session or the referenced ticket.
A message is limited to a size of 20MB.
Forward Chat
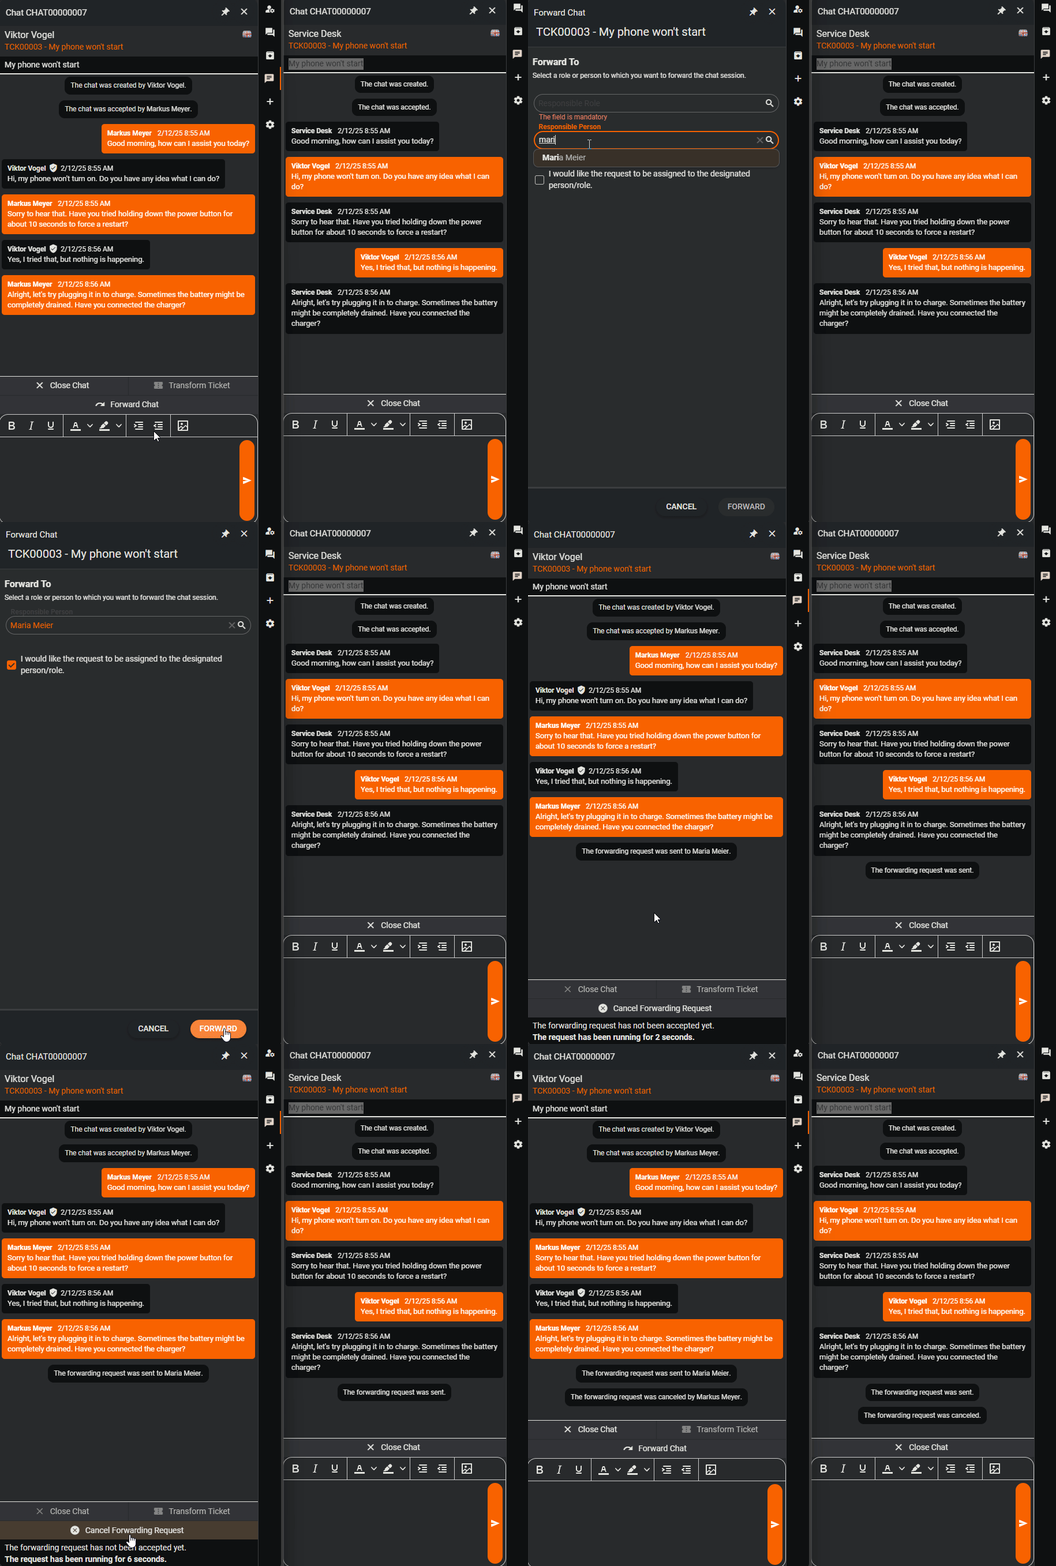
From version 1.1.0 of Service Desk Chat, we offer you the option of forwarding active chat sessions to people or roles. To forward a chat session, click on the „Forward chat“ action. This action opens a wizard in which you can enter the person or role to whom you want to forward the chat session. As soon as you want to forward the chat session, you as the agent will no longer be able to communicate with the end user. However, we offer you the option of canceling the forwarding request. If the forwarding request is accepted by the new agent, a new chat session is created. The end user will not notice any difference, apart from the changing agent. The messages from the previous chat session are still displayed so that the history can still be viewed.
Chat & Request Close
Within the chat view, you can also close the referenced request and the chat session or convert the ticket. The option to close the referenced request is only shown to the agent if the request is an incident or a service request. Otherwise, a button for converting the ticket is shown at this point. There is an action bar above the text field for these three options.
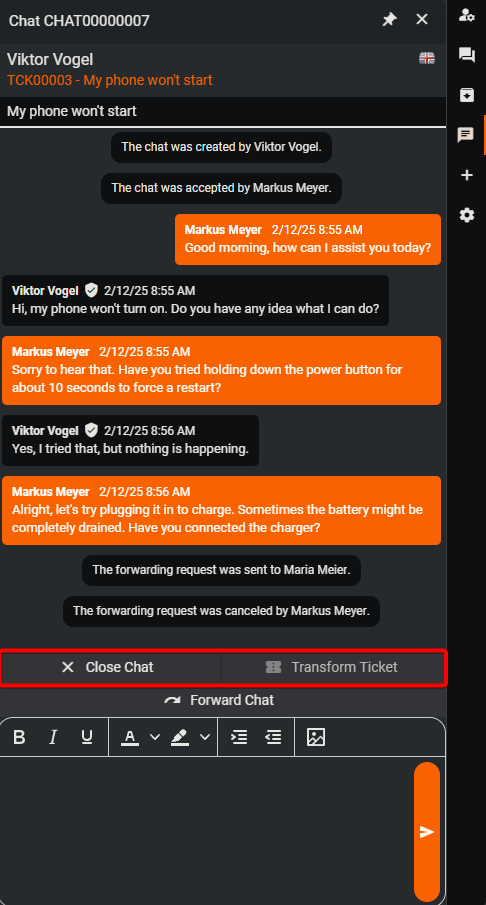
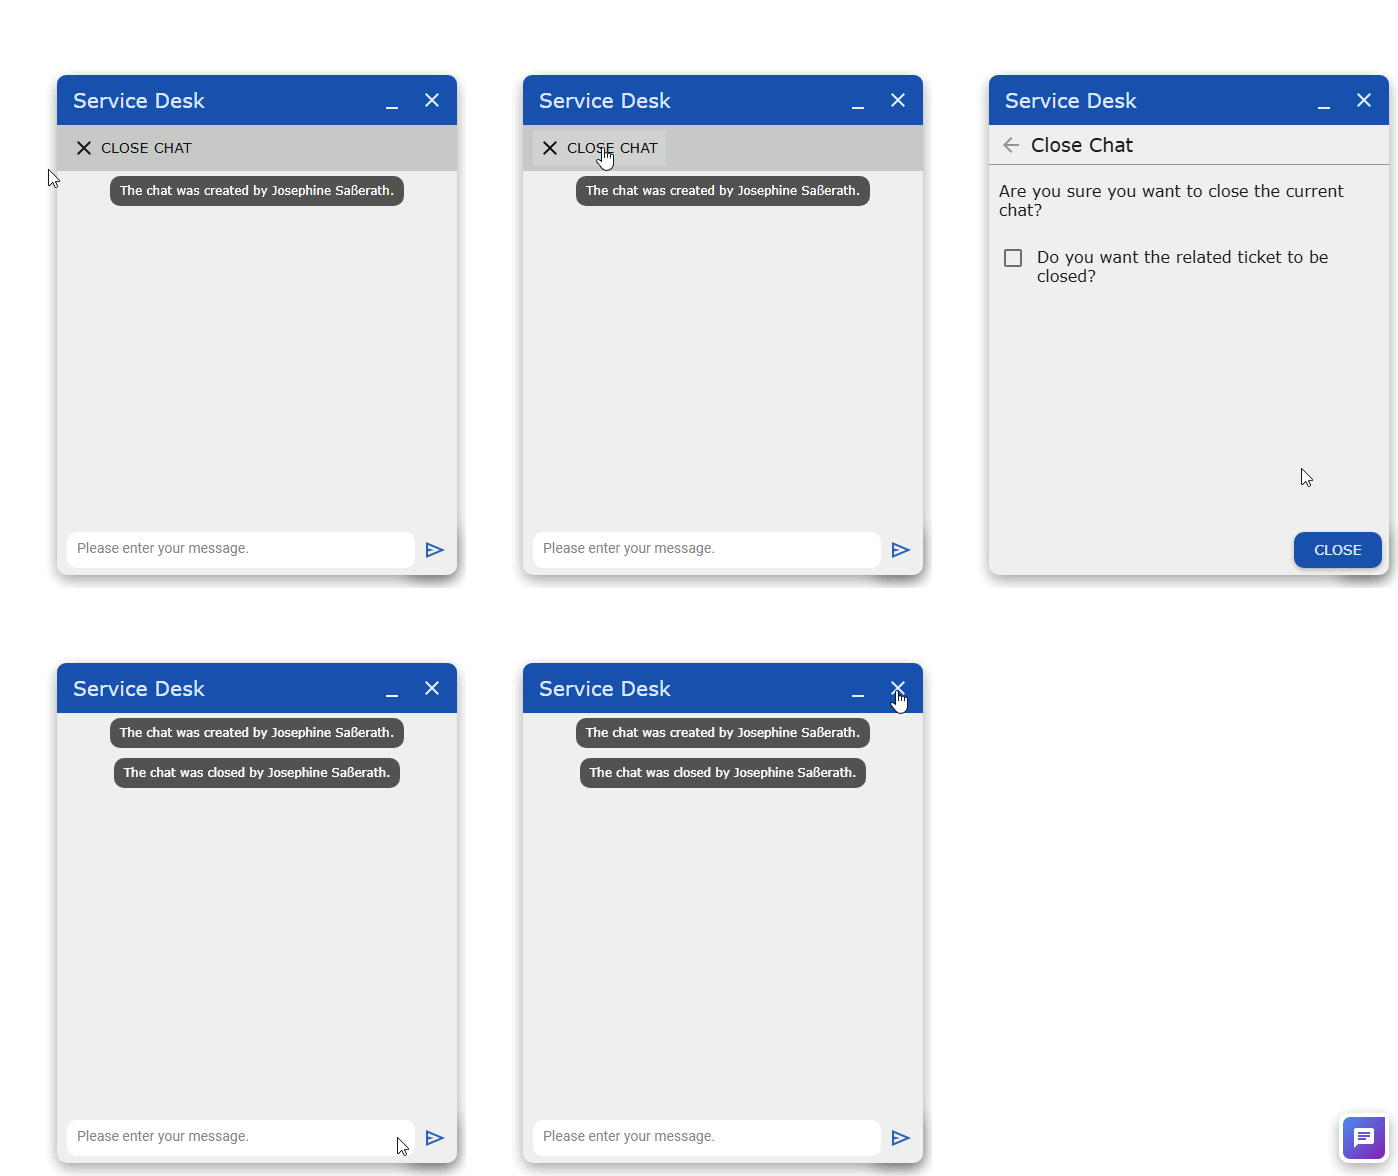
If you click on the „Close Chat“ button, a chat close wizard opens. If you open the close chat wizard as an end user, you can use the checkbox to inform the service desk employee that the request should also be closed. You also have the option as an end user and as an agent to automatically send the chat transcript to the agent after closing the chat session.
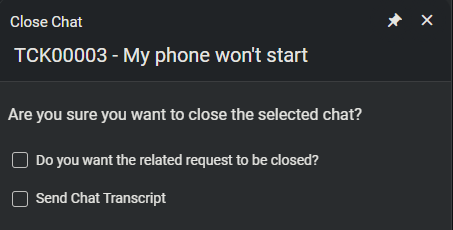
As a service desk employee, you will also be shown a checkbox, which allows you to close or convert the request after closing the chat session.
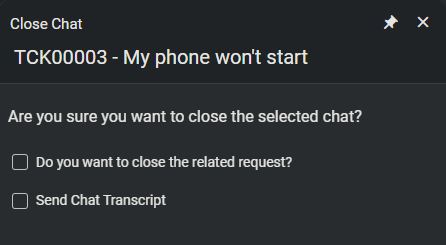
Send Chat Transcript
With the new version of Service Desk Chat, you have the option of sending a chat transcript to the end user after closing a chat session. You can do this either via the close wizard or afterwards in the chat view after closing the chat session. Please note that the chat transcript can only be sent once.
Info-Notifications
The Service Desk Chat extension also displays info notifications. A button is displayed in these notifications, which opens a wizard within the Service Desk Chat extension.
If you change the responsible role of the request, such notifications are displayed for all members of the new role to accept the associated chat request.
Furthermore, a notification is displayed for a new responsible person to accept the chat request. The notification is only displayed if the new responsible person has access to the chat requests.
If a request for a chat session assigned to you is closed, a notification is displayed asking whether you want to close the associated chat session.
Create Chat Session – Action
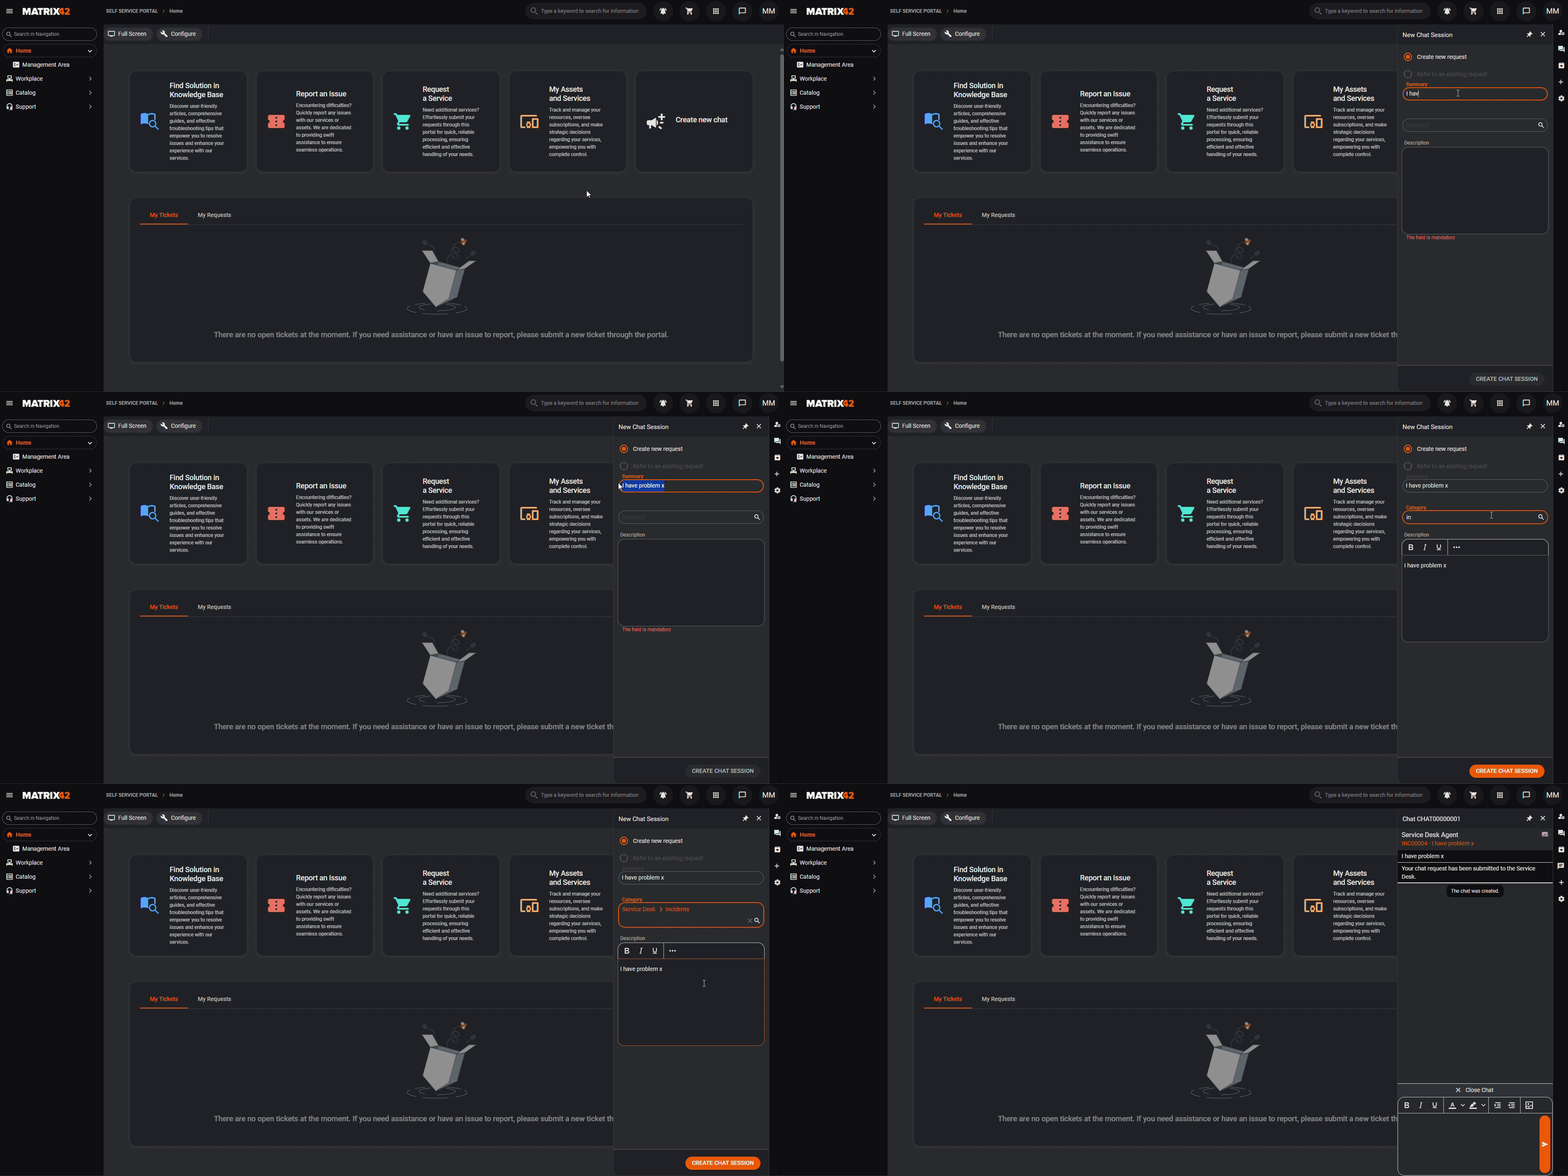
When the Service Desk Chat application is installed, the „Create chat session“ action is also installed. This action opens the „Create chat session“ dialog within the Service Desk Chat extension. By default, the action can be used within the Self Service Portal and Service Desk application and can be executed directly on a request if required, whereby the request is automatically set in the dialog when it is created.
You are advised to authorize the action for the end users, as otherwise it cannot be used for the end users.
An example of the action would be the integration into the home page of the Self Service Portal. In the following GIF you can see the application of the action in the Home Page. Instructions for integrating a quick link for the action in the Self Service Portal can be found in this documentation under „Integrating the quick link for creating chat sessions in the Self Service Portal“.
In the next image you can see the action directly on a request.

Display the chat sessions of a request – Action
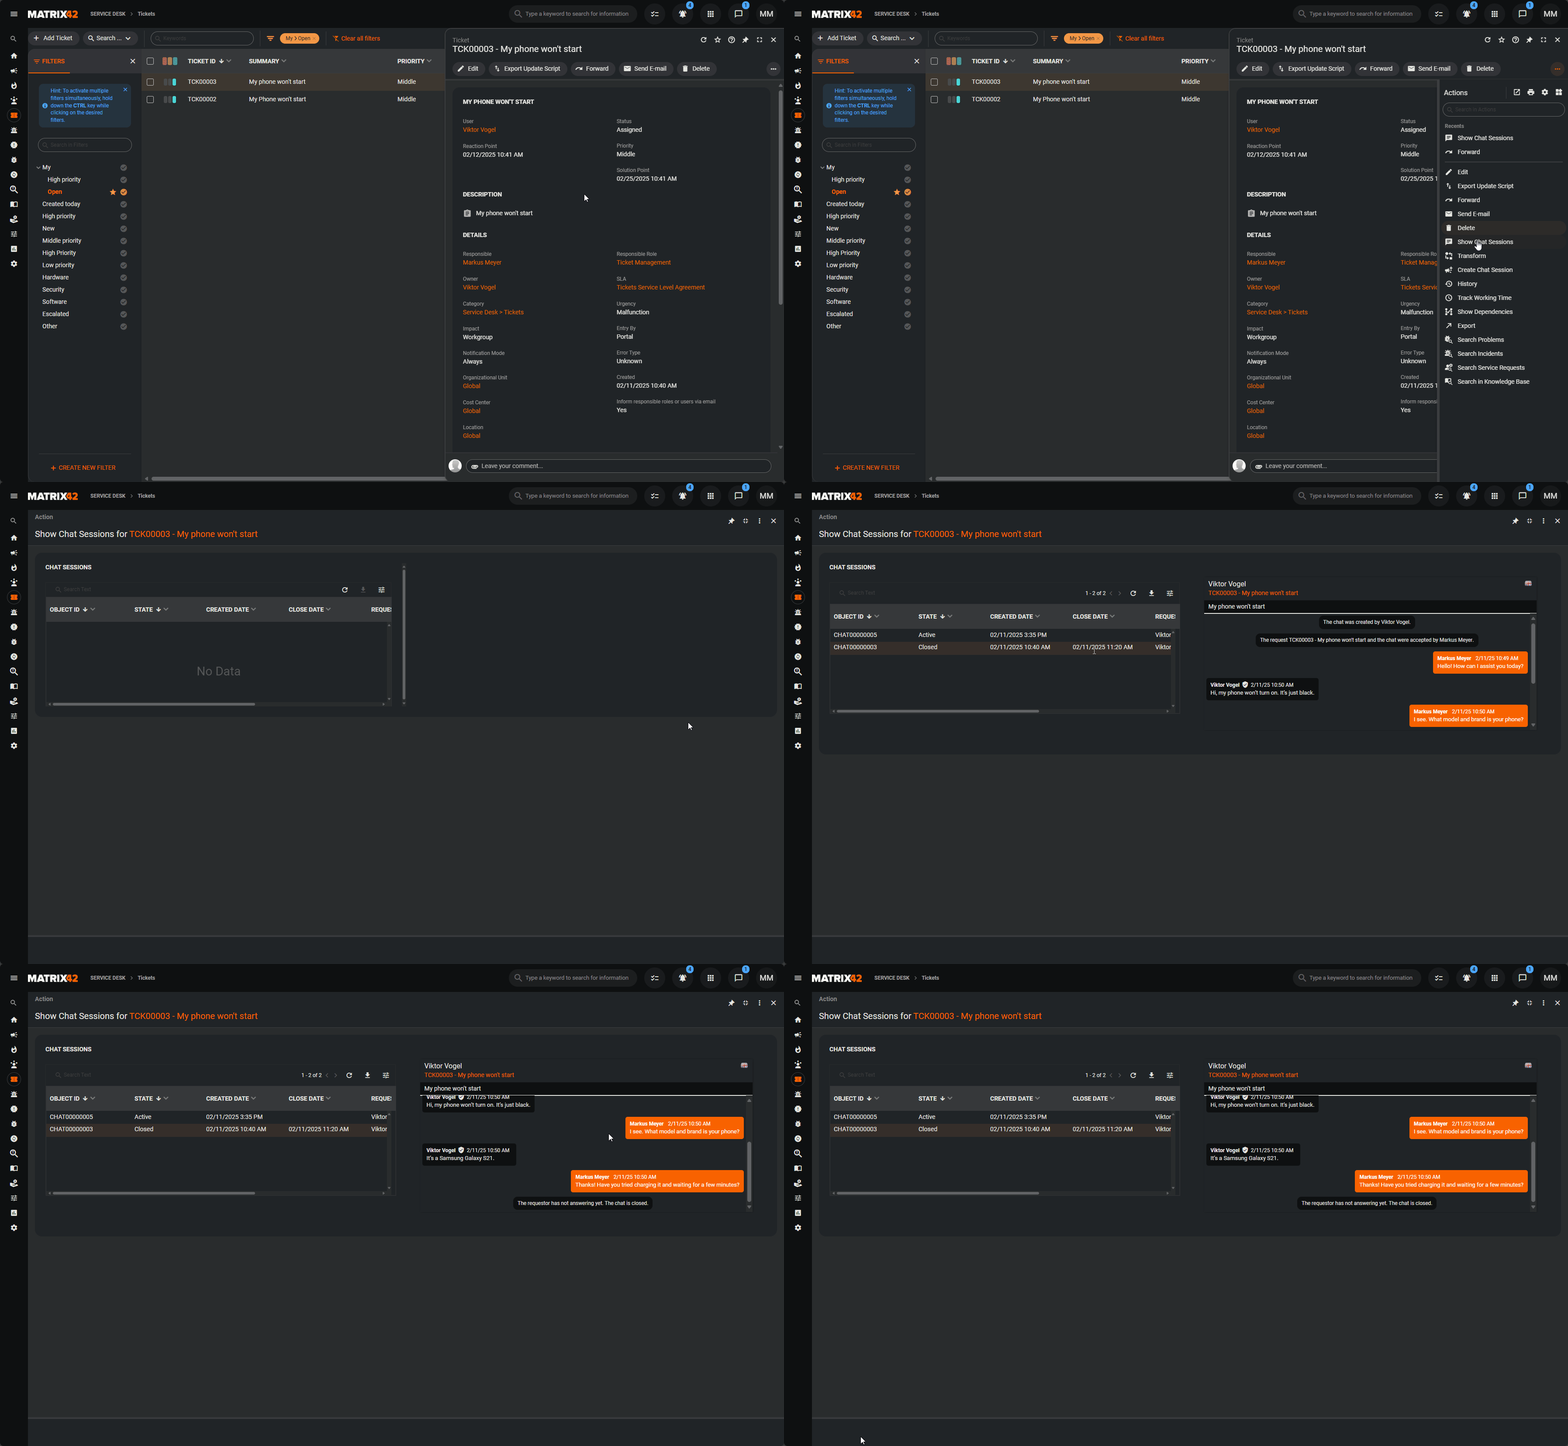
The „Show Chat Sessions“ action is available in the Service Desk for tickets, incidents and service requests to make the chat history traceable. Clicking on the action opens a view in which you can see all chat sessions for the request and clicking on a chat session opens the chat history of the chat session.
Before using the action, you should authorize it so that the action is displayed for the service desk employees.
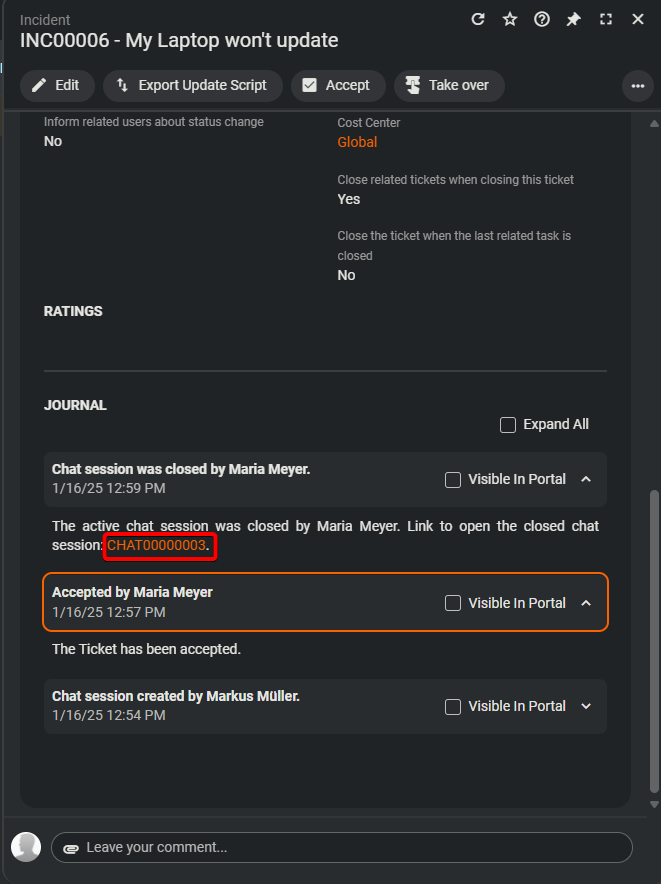
Journal entries with link to the chat session
If you configure the extension so that journal entries are generated on the request when a chat session is created, forwarded and closed, you have the option of opening the chat session directly on the request via the journal entries.
Personal Configurations
In the right-side bar you have the Settings button, which you can use to set your personal notification configurations.
Supplied Controls
We supply two controls with the Service Desk Chat extension. You can use these controls in all widget types, apart from a content widget list and an email template.
The „Labtagon request chat sessions“ control is used to display a list of chat sessions from a stored request. You only need to enter the object ID of the request in this control.
In addition to the aforementioned control, we also provide the „Labtagon chat session preview“ control. This control shows you the exact chat history of a chat session. To display this control correctly, you must enter the chat session ID. You should also set the height of the control element. A height of 350px is used by default.
Deeplinks für Chat-Sitzungen
As of version 1.2.0 of Service Desk Chat, it is possible to use deep links. With the help of deep links, you can create a new chat session directly via a link or open an existing chat session.
For example, use the following URLs for the these functionalities:
- Creating a new chat session: „{matrix42EsmUrl}/app-SelfServicePortal/landing-page/14587d3e-63aa-e611-d99b-bc5ff41a70c0/chat//“
- Creation of a new chat session with reference to an existing ticket/incident: „{matrix42EsmUrl}/app-SelfServicePortal/landing-page/14587d3e-63aa-e611-d99b-bc5ff41a70c0/chat//{ticketFragmentId}“
- Open an existing chat: „{matrix42EsmUrl}/app-SelfServicePortal/landing-page/14587d3e-63aa-e611-d99b-bc5ff41a70c0/chat/{chatFragmentId}/“
Operation Teams Relay – End user
When using Teams Relay, all end users can communicate with your service desk via the Microsoft Teams application.
Please note that the end user can only have an open chat session via the Microsoft Teams application. If the end user has access to your Matrix42 ESM, the end user can run an open chat session via Microsoft Teams and also start new chat sessions in the Matrix42 ESM. The service desk employees communicate exclusively via the Matrix42 ESM.
Creating a chat session
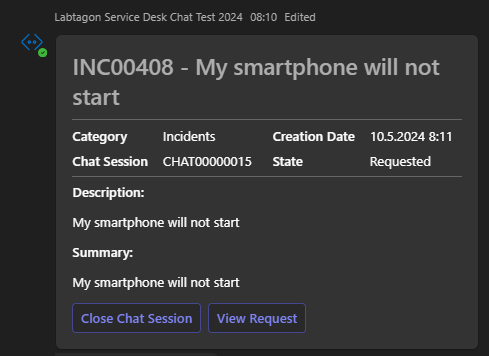
To create a chat session, write a message to your Microsoft Teams bot. The following form will then be displayed. Enter all the required information there and then click on „Create a new chat session“.
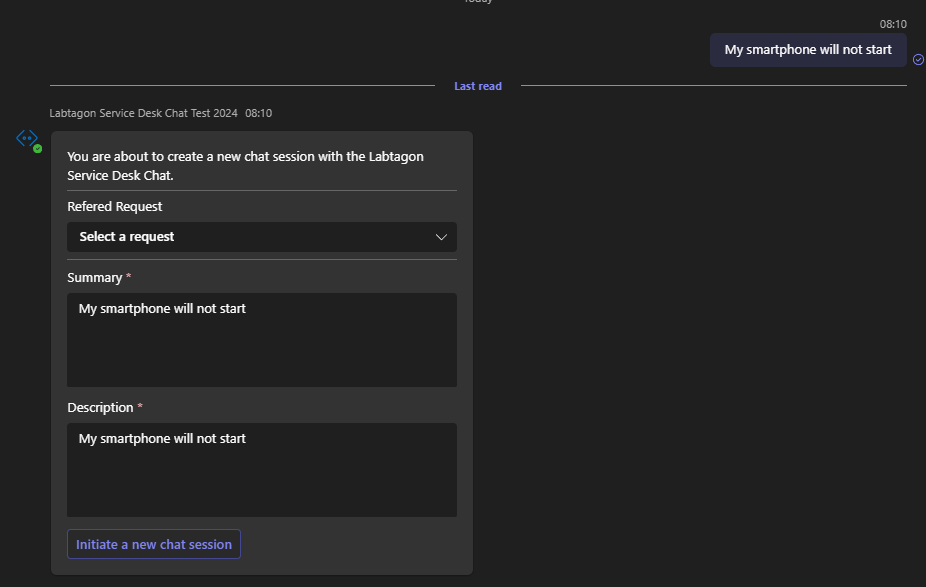
After creation, the card is changed and a system message is sent as usual, which is marked with a purple font color. Now you can communicate with your service desk in the same way as via the Matrix42 ESM.
Closing a chat session
As an end user, you can close the chat session directly using the button on the card.
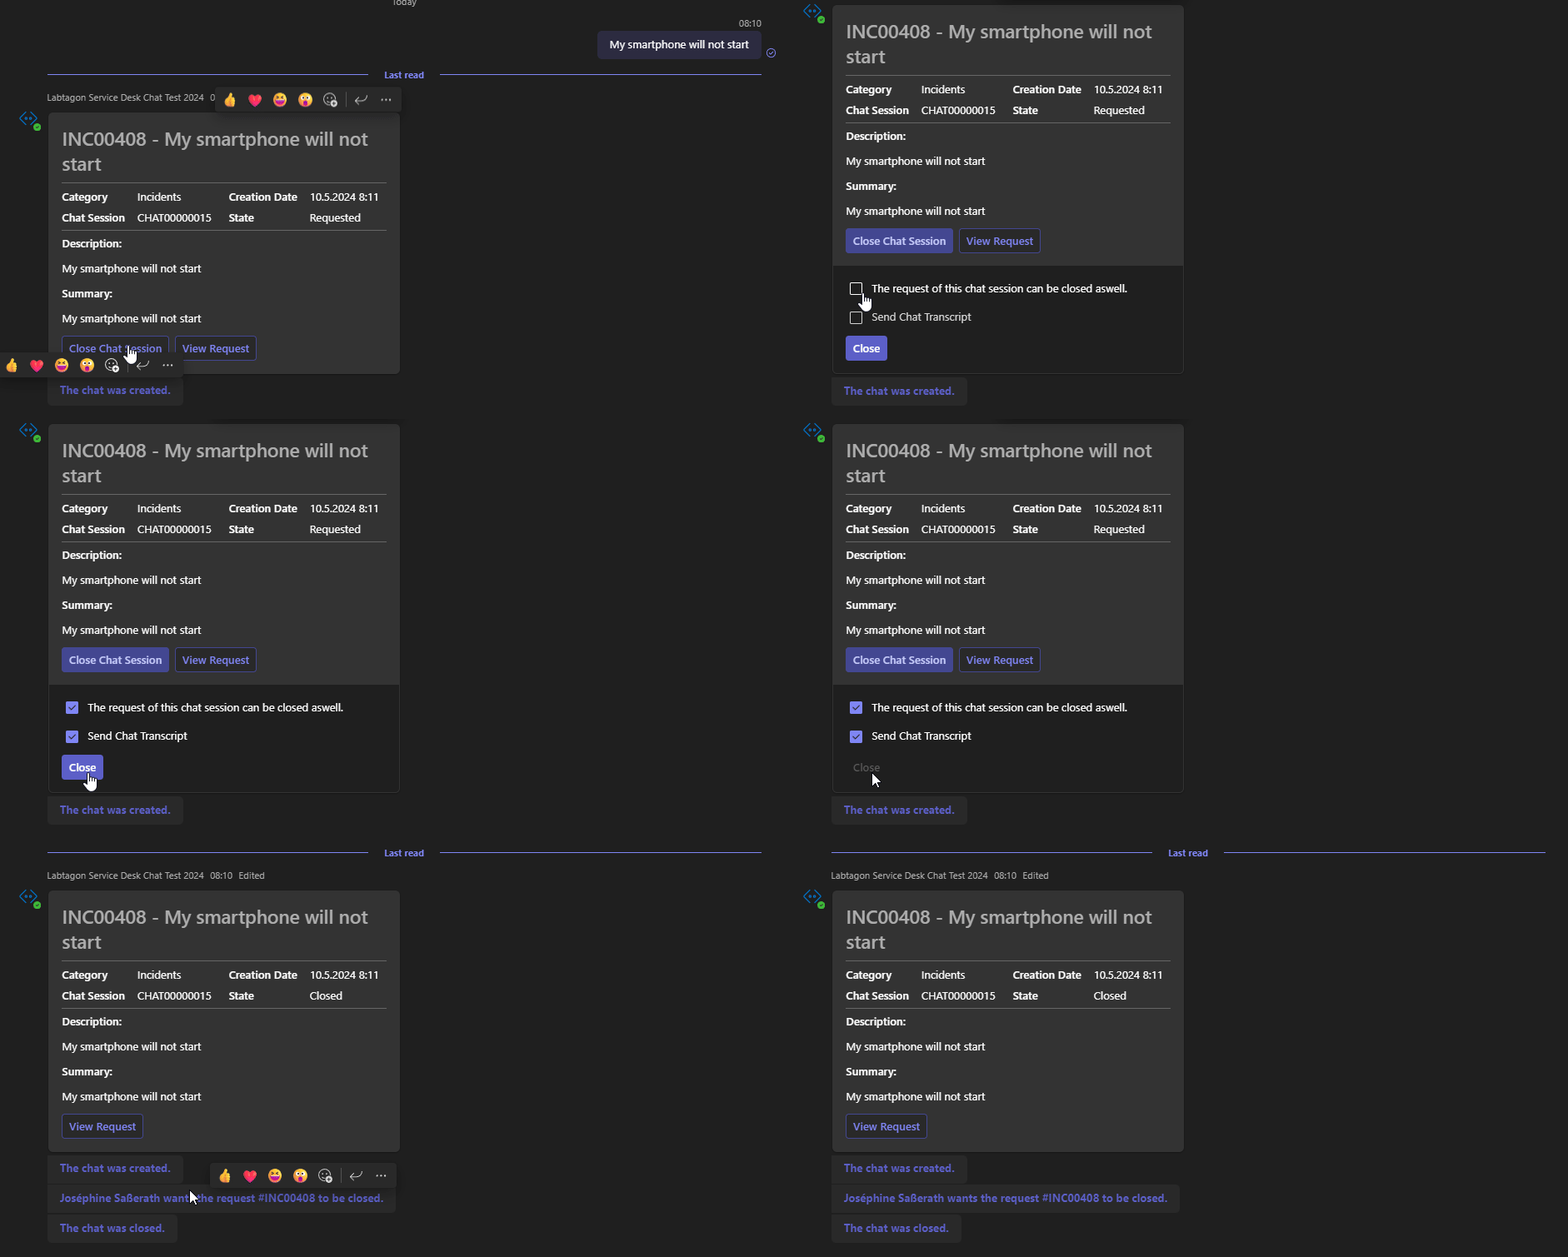
Show Request
If you want to find out more information about your request, you can display the request in your Matrix42 ESM by clicking on the „Show Request“ button on the map.
Operation External Website Relay – End user
With the new Relay, you have the option to use the Relay on your website as well, allowing end users to chat there. The chat sessions are created as usual in your Matrix42 DWP and can be managed by agents there. You can find more detailed information on configuring the relay in the following documents Service Desk Chat Relay and Service Desk Chat JS Integration Guide.
Creating a chat session
End users can initiate the chat as shown in the following GIF. Prior to this, depending on the configuration, the user must agree to the relay conditions. Following that, the user needs to provide their contact information and a description of the issue.

Closing a chat session
The end user has the option to close the chat using the buttons in the interface or to request the chat history to be sent to them.
